5.26.2012

Olympus E-M5: Post #10: Adding the grip accessory

I had pre-orderd the HLD-6 grip just a few weeks after I pre-ordered the E-M5, both in February.  The grip arrived earlier this week and is a great addition to this otherwise (too?) small interchangeable lens camera.

I was a bit worried when I pulled out of the box a thicker-than-expected set of directions.  But my worry was ill-placed, as the directions were in about 100 languages (and I only needed one!)  Actually, all I really needed to install the grip was the picture diagram shown in the set of images below.

The grip in ingenious.  It comes in two pieces.  The first piece can be used independently from the second piece.  It is a horizontal grip that provides a much more secure grip for the right hand when holding the camera in the landscape orientation.  Interestingly it provides an additional shutter and front control dial.  These are duplicates; they do not add any features, but merely give another location for dials of similar function on the main camera.  Unfortunately, it does make it a bit more awkward to reach the two function buttons (Fn2 and Rec buttons) on the top plate.

The second piece is the vertical grip. It must be attached to the horizontal grip. I am very much looking forward to using this accessory. I take a lot of vertical landscape images and have always noticed that when I hold a camera in the vertical orientation that my hold is less secure and a bit wobbly.  Since I rarely use a tripod, I depend on a strong, stable, steady grip.

Two batteries are accommodated, though none are supplied with the grip and at this time authentic replacement batteries are not yet available.  One battery remains in the main camera battery, so if you remove one or both grips, you are "good to go".  The second battery resides in the vertical grip.

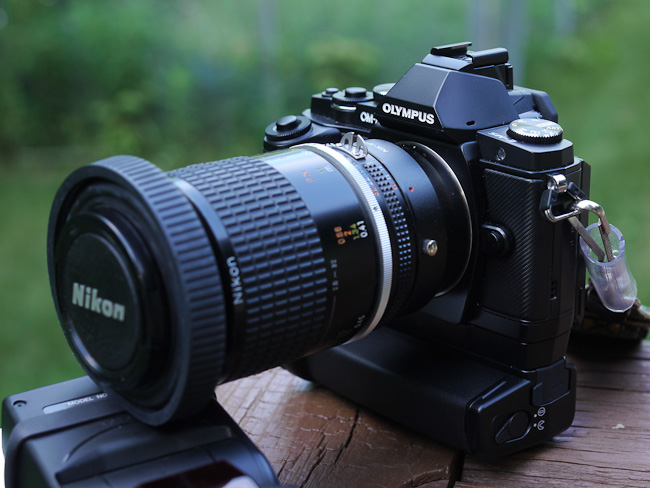
Below are a dozen images taken while assembling the grip, in sequence.  The old Nikon lens is attached with a Nikon-to-m43 adapter (about $20 from eBay) and a 105mm macro lens.


At this point in the process, just the horizontal grip
has been added.  Note the double shutter button
and double front wheel.  You can use either.

The vertical grip is then added to the horizontal grip.  Just screw them together
tight enough so the electrical contacts are made.

Voila

My intial impression is that the vertical grip should be a bit deeper.
It's actually shallower than the horizontal grip.

One battery can be housed in the handle, and one
in the main body.  Currently I have only one
battery... and it is in the handle for eacy access.

Old Nikon 105mm micro


5.22.2012

Flowers from our yard. Ambient light plus fill flash

Looking for some shutter therapy (as Robin Wong would say) this past weekend, I spent a few minutes each morning and evening around our yard taking flower pictures wherever I could.  These are all hand held and exposures were aided with a flash.  Using a flash for close up photography is new to me.  Actually, using a flash at all is a pretty new concept for me.

I basically used aperture priority and ISO adjustments sufficiently high to match the ambient light, while at the same time maintaining a shutter speed of 1/250th second.  The flash was set at Auto TTL.  If any part of the flower was then overexposed because of the flash, I would have given some negative compensation to the flash.  But as I recall it wasn't necessary.
The lens used is an old Nikkor 105mm micro lens, with an aperture ring on the barrel of the lens.  I tried to keep thing simple by either using F4 or F8.

The full set of 17 images is at this link:
http://www.peterfraileyphoto.com/p115089043

Five of my favorites of this set are below:


5.21.2012

I love pastries (food photography)

Food photography is something I know very little about.  I was upset this winter when we had a food photographer come to our local photo club to give a one-night workshop, and I was unable to attend.

Well, this morning at work a platter full of tasty pastry treats was brought to the office by one of my co-workers.  I happened to have an old Nikon macro lens in the car attached to the new Olympus E-M5. 

The lens performs nicely.  (I've really liked it on some recent flower pictures.)  Any problems with these images are completely user-error.  Probably too little depth of field (i.e. only a small plane is in focus), as I was trying to keep shutter speed up and aperture nearly open. 

And I got seduced by the macro capability and got too close.  I think if I had moved back and got more of the treats into the image, it would have been better.

Anyway, these are hand held shots with an 105mm (210mm-e) lens, ISO 3200, no flash, at 1/160 and 1/200th second shutter speeds.  There are no electronics to the lens so the aperture is unknown by the camera, and I have no recollection either.  Best guess: F4.


5.13.2012

People pictures with shallow depth of field

I am not particularly interested in portraiture that entails setting up lights and diffusers, umbrellas, reflectors, etc. in a studio or even outside.  My photo club has offered workshops in this genre of photography in the past, and I have not even been interested enough to attend and listen, let alone participate in the photographing of models in front of lights.

Candid people pictures are a little more my style.  But I am not very good at it.  I would never make a good street photographer, in fear that I would be observed by my subject and reprimanded. 

Until recently, all my people pictures were taken with point and shoot cameras using natural light when available and the little pop-up flash when more light was required.  And you know how ugly those flash photos can be: a black background with the people looking like deer-caught-in-headlights.

I viewed these "candid" images pretty much as snapshots: great for family and friends to look at online or in 4" x 6" prints.  These images recorded memories (which in itself is a good reason to take a picture) but are not much in the way of art.

However, this all changed last fall at my step-daughter's rehearsal dinner.  I had just become a new owner of a micro-four-thirds (m43) camera, the Panasonic G2.  [I no longer have this camera, having loved it so much that I upgraded to the GH2, and more recently I added the Olympus E-M5 to my toy chest.]  M43 cameras are thinner than dSLRs so with a small lens adapter you are able to use almost any old lens, as long as the adapter has been designed for that particular lens. 

For $20 on EBay I bought a m43-to-Nikon adapter.  I then attached an old Nikkor 58mm F1.4 lens.  Because the sensor on a m43 camera is 1/2 the diagonal dimension of a full frame (FF) camera, the 58mm lens gives a more telephoto view, equivalent to the field of view of a 116mm lens on a FF camera.  This made for an awesome people lens with great light collecting ability and a pretty shallow depth of field. 


Below are a few shots I took in the bar after the dinner.  Nothing outstanding, but I loved the shallow depth of field I got by using the large aperture of F1.4, F1.8 or F2.  Mostly shot at ISO 1600, the G2 was a bit grainy.  A fill flash would have been a great addition, and likely the first recommendation any accomplished portrait photographer would recommend, but I didn't want to attract attention to myself nor appear to be annoying.

The large aperture lens meant a far blurrier background than what I could get with a point and shoot camera, where the depth of field is bigger at any given F-stop due to the physics of the small point and shoot sensor size.  The blurry background (and foreground) that I was able to achieve helped draw attention to the main subject, as the eye goes naturally to the sharpest part of the image.


This image more than the others would have been greatly helped with a little fill flash.
It would have eliminated the racoon eyes  (i.e. shadows created by the overhead
lights) on this party-goer who was "haming it up" for the picture.


I was excited by these pictures.  I had so much fun.  All would have been better with fill flash, but with a flash I would not have been able to move around unnoticed.  I took a number of images of the groom and his entourage shown above in black and white, and not once did any of them notice I was clicking away.  I am sure the excitement in part was from using an old manual lens designed for a 35mm film camera on a new digital camera. That made the exercise a bit challenging, but also rewarding.

5.11.2012

Olympus E-M5: Post #9: Dynamic Range Part 4

If there is a dynamic range difference between the two year old Panasonic GH2 and the new Olympus E-M5, I can't see it in the shadows.  Since tests by dpreview show that there actually is a difference, with the Olympus seeming to have 2/3 of a stop more dynamic range in the shadows, I am wondering if testing devices are so good these days that they can see nuances that escape the human eye!  Or, maybe I need to do some testing at higher ISOs.

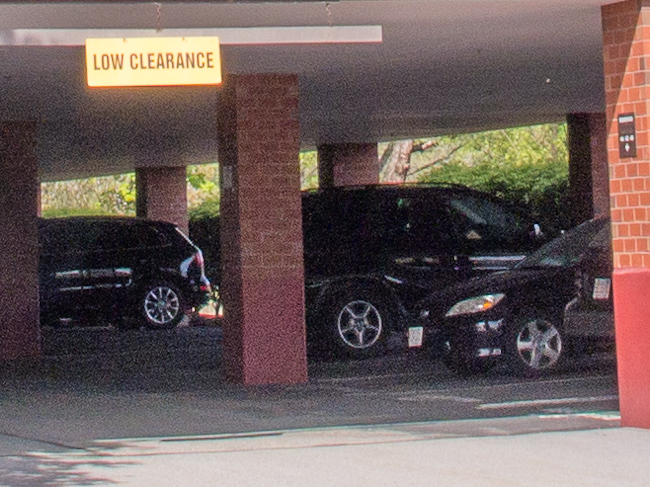
Below are two images taken with the same lens, switching between cameras on a bright sunlit day with deep shadows in the parking area under this office building.

Both images were developed from RAW with default settings in Lightroom 4, except white balance.  I equalized the white balance settings at the daylight setting of 5500 degrees Kelvin.  Interestingly, the Panasonic metered at 4950 degrees and the Olympus at 5250 degrees. This was in spite of the fact that I have made no white balance adjustments in the cameras

If you see a difference with respect to dynamic range, between the Oly and the Pany, your eyes are better than mine.  Perhaps I see slightly more detail in the Oly in the 100% crops, but is that just because I know there is "supposed" to be?

In each of the following pairs of images, Olympus is first, Panasonic is second.  Larger images are on my Web site, here:
http://www.peterfraileyphoto.com/olympus-em5-dynamic-range-pt4


Olympus 1/250th F8 iso200 14mm (14-54II)

Panasonic 1/250th F9 iso160 14mm (14-54II)
100% crop of Olympus image, of parking area entrance under the building
100% crop of Panasonic image, of parking area entrance under the building

Olympus at 100% crop. Shadow slider at 100% to open the dark area under the garage.

Panasonic at 100% crop.  Shadow slider at 100% to open the dark area under the garage.

Conclusion

[Edited July 25, 2012]

As I mentioned in the opening paragraphs, based Based on these images I can't see (any practical) tell the difference in dynamic range (or image quality for  that matter) between the two year old GH2 and the new E-M5.  And that is after looking at 100% crops and trashing the image by running the shadow slider to 100%.  As far as I am concerned both cameras have fantastic image quality.


But
But, on the other hand I haven't checked out the highlights.  I intend to take a couple of comparative images with blown highlights at various overexposures to see which camera is able to recover details better in blown exposures.  This will be a topic for another day and for another post.

5.09.2012

Olympus E-M5: Post #8: Dynamic Range Part 3

I received an email about the last couple of posts.  Seems my conclusion that the dynamic range of the E-M5 and GH2 is similar is contrary to what's being published on the Internet.  According to many users and reviews it is claimed that the dynamic range of the E-M5 is higher than the GH2.

That may be true and I hope it is!  But, actually what I posted in the prior two posts was that in the one shot in which I compared the two cameras the dynamic range was similar.  Assuming for the moment that the dynamic range of the E-M5 is greater than the GH2, the reason that they seemed similar in my example is because the sensors were not being stressed enough to show a difference.  I plan to try the experiment on some images in more challenging situations, although my guess is that in the "real world" the difference will not really make a difference.

With regard to the images I used in the prior two posts, examining the histograms shows that though there were bright areas (clouds) and dark areas (pine trees) in the scene, that this was all handled nicely by the sensors.  As you can see below, the histograms are pretty normal (and very similar), with few pixels on the black and white ends of the spectrum.  There were no "blown out" highlights and no "blacked out" shadows.

Olympus E-M5 histogram of original image in prior post

Panasonic GH2 histogram of original image in prior post
I'm working on another sample in which I have definitely created a dark scene within a relatively bright scene.  The dark areas will come from a parking lot under my office building. It will be the subject of my next post.

5.08.2012

Olympus E-M5: Post #7: Dynamic Range Part 2

For this post, I have taken yesterday's two images (see prior post) which were processed from RAW files at default settings in Lightroom 4 and today I "opened" the shadows using the Shadows Slider in Lightroom.  I moved the sliders all the way to the right, to 100%. In this way I "engineered" more dynamic range.

The first two images are the "before" and "after" shots from the Panasonic GH2 and the second two images are the "before" and "after" from the Olympus E-M5.

Panasonic GH2 before and after shadow slider adjustment


Olympus E-M5 before and after shadow slider adjustment


My Conclusion


Clearly there is a difference between the before and after shots. But when it comes to comparing the two "before" shots to each other, and the two "after" shots to each other, I don't see any meaningful differences. I would have to conclude, at least for this scene, that the dynamic range of the two sensors is the same. That is, both captured details in the highlights and the shadows equally.

Off topic:  I do feel that panasonic images have a bit more magenta in them, as seen in the black macadam driveway.


Larger files of the four images can be found here:
http://www.peterfraileyphoto.com/em5dr2

5.07.2012

Olympus E-M5: Post #6: Dynamic Range Part 1

Much of what I have read tells me that the dynamic range of this new Olympus has improved over other recent Olympus m43 offerings.  This may be true, but the only m43 format camera I have to compare it with is the flagship of the Panasonic line, the GH2.

Dynamic range refers to the camera's ability to provide decent detail in both the brightest and the darkest areas of a picture.  After all, when you take a picture, the camera provides only one exposure and it is usually an average based on light tones, mid tones and dark tones.  Mid tones might be exposed perfectly but light tones might be overexposed and dark tones underexposed.  The less the dynamic range, the more likely this will be the case.  And of course it is especially noticeable in images where there are both lots of bright areas and lots of dark areas.

Today, I compared the GH2 and E-M5 with a couple of pictures that had both bright areas (white clouds) and dark areas (shadows in the trees).  As it turns out, neither camera was stressed by these conditions and both did a very nice job providing details in the clouds and sky while at the same time not being too dark in the shadows.  Of course, the human eye would be able to see more deeply into the shadows than this, but a camera's sensor does not have the dynamic range of the human eye.

As far as I can tell, if there is a difference, it doesn't make a difference. These both look good to me, and quite similar.

However, I will try to find a more rigorous test.  This will require a scene with even more contrast, with brighter brights and darker darks.

These two images are jpegs created from raw files in Lightroom 4.  The lens was the Olympus 14-54II.  Both were shot and 1/125th and F11.  I used P-mode and autoISO.  Both cameras set ISO at base levels of 160 (Pany) and 200 (Oly).  In Lightroom I set WB at 5500 Kelvin.  I used "Auto Tone" to equalize the exposure, contrast, and saturation settings.  I used Lightroom's default sharpening settings.

If you want to see bigger files, they're here:

http://www.peterfraileyphoto.com/em5dr

Panasonic GH2 with Olympus 14-54II.  A bit more magenta than Olympus even
at the same WB setting. Note the "purple-ish" color cast in
the driveway asphalt.  But the dynamic range seems the same as the Olympus
(see below).

Olympus E-M5 with 14-54II. Dynamic range seems to be equal to the Panasonic.  To me, both look good.


Conclusion:  As far as I can tell in these two shots the dynamic range is the same.  I do like the color profile of the Olympus shot.  It doesn't have the purple color cast that I see in the Panasonic file.  A tweak here or there in Lightroom might get rid of that. Noise and sharpness seems identical.

The next step with these images it to see if one file is easier than the other to bring up (i.e. lighten) the shadows, as the shadows here are darker than what my eyes saw.  In other words, perhaps we can "engineer" more dynamic range better from one than the other.

5.06.2012

16 Best Butterflies from yesterday

[Update: Actually, I've done some editing and there are only 12.]

Using a flash on my new Olympus E-M5, I went to our local butterfly house yesterday morning for an hour of shooting. I had a pretty heavy set-up on this little camera, as I used my Olympus 70-300 zoom and the 36R auxiliary flash.  [The E-M5 is designed as a small ILC - interchangeable lens camera.]


I can't wait for the extra grip accessory to arrive.  It's on back order.  Having used an accessory grip (often called a battery grip because it allows you to use two batteries) on my Olympus E-620 I am very confident that the optional grip for the E-M5 will greatly increase the handling comfort of this little gem of a camera. 

All of the butterfly images are with this simple flash set up.  I was quite pleased with the results.  I am actually thinking  I may be catching onto the whole flash thing, at least at a basic one-flash-on-board-the-camera level.  My goal is to have the flash light up the subject without having that "deer in the headlights" look you often get when using a flash. 

The next time I try this, I will bring along with me one of the many commercial diffusers which should soften the light from the flash and hopefully help it blend in more with the ambient light.  I've actually purchased a couple of cheap options, but forgot to put them in my bag for this outing.

The 12 photos are on my Web site, here:

http://www.peterfraileyphoto.com/butterflyplace2012may5

5.05.2012

Olympus E-M5: Post #5: Butterflies

For folks interested in the new Olympus E-M5, I have posted on my Web site 3 images of each of 16 photos of butterflies taken today.  The link is below.

This is for geeks.  In each case I am showing (1) the Olympus out-of-camera JPEG followed by (2) Colorchecker Passport JPEG from RAW in Lightroom 4, and (3) Adobe Standard JPEG from RAW in Lightroom 4.

Yes, there are subtle differences, but I only notice it on larger sizes. To my way of thinking "the differences between them don't make a difference."

Below is one example.  See!  No (significant) differences.

The rest are on my Web site here:

http://www.peterfraileyphoto.com/butterflies2012may5