8.08.2012

Canadian Rockies: Day 2 of 14/ Part 1

----------
Today's Itinerary: Spokane, WA to Boner's Ferry, Idaho


----------
Note: Hang in there, all you mountain lovers....
We will be into the Rocky Mountains (via Kootenay National Park, Alberta) on Day #.
----------
Over the years I've bought a ton of fly fishing equipment from Cabela's by catalog, and more recently via their fine Web site. So when I learned that one of Cabela's bigger stores (there are about 30 stores nationwide) had recently opened in Idaho and would be along our route, I was excited


I've never been to a Cabela's store. Lots of outdoor gear. I think Cabela's is what L.L. Bean used to be. (To me, L.L. Bean has lost its roots and is now all about clothes.)


I couldn't resist including this shot

Though I was easily lost in the fishing gear section of the building and Laurie found some great bargains in the sale area, we were nevertheless most impressed with the taxidermy. The "mountain" in the center of the store was surrounded with all sorts of taxidermy. Apparently, Cabela's has one employee who is their taxidermy buyer. And he does it full time, across all of their stores.


We purchased a few t-shirts and gifts and finished up with a visit to their own Pine Tree Cafe, where we each ordered the "Outfitter": pulled pork sandwiches with french fries and a soda.  Yummy.

8.07.2012

Canadian Rockies: Day 1 of 14: Flying

----------
Today's Itinerary: Fly to Spokane, Washington and pick up the car.

The circled "1" on the map indicates our location on night #1.
I will use this format throughout.
----------


Our US Airways flight was from Boston to Spokane, Washington via Phoenix.  Other than almost missing getting on the plane at Logan while we sipped Starbuck's coffee and people-watched, the trip was uneventful.

When we pick up our car for these kind of car-traveling vacations, one of the first things we do is get a cooler full of ice and buy soda, water, fruit and cold cuts.  Plus non-refrigerator items like bread, nuts and crackers.  Our preference is always for an SUV.  In this case it was a Honda CRV.


We had dinner at a small northwest chain, McKenzie River Pizza Company.  Here is a list of its locations.  Below is a well-deserved "cold one".

7.29.2012

Front yard insect

On Friday after work the dark rainy-day sky began to brighten and I started looking at our front yard flowers for insects.  I am not a huge insect fan and I barely know an ant from a beetle.  But I do like the challenge of capturing them with a camera and close-up lens.

I spotted this little fellow (he was about 1/2" long) and stuck an old Nikkor 105mm macro lens on a micro 4/3 camera body (Olympus E-M5).  I really like this combination.  On the micro 4/3 body it provides a 1:1 macro and a field of view equivalent to 210mm.

For these two shots I actually ignored everything I have read about "diffraction" from small apertures softening the image, and I set the aperture ring at F16.  [I've never really pushed things before, and typically for macros I use apertures no smaller than F8.] 

To the extent that these may look "soft", I will need to do more experimenting.  Rather than a lens issue, it may be simply that things aren't as sharp at high ISO setting, such as the ISO 2000 and 1600  used in these two images.  A flash would have solved the ISO problem.


7.27.2012

Olympus E-M5 Post #11: Dynamic Range Part 5

A while ago I tested the Panasonic GH2 and the Olympus E-M5 to see if I could see a difference in the dynamic range of the camera.  In the last test I did I determined that when it came to the shadows I really couldn't tell the difference.  But from what I've read, there should be a noticeable difference in the highlights.

So, I decided to check this out on my own.

I shot the scene in the images below in P-mode with my reg43 14-54II zoomed out at 14mm on both cameras.  To simulate a high dynamic range situation,  I shot (1) a base case, (2) 1-stop overexposed, and (3) 2-stops overexposed.  I didn't care that the F-stops and shutter speeds chosen by each camera were different.  I simply shot the way I would in the field when shooting landscapes, using the live histogram to guide my exposure settings, but adding 5-shot auto exposure bracketing to get the two overexposed shots.  All images were taken in raw.

Base Images

Below are the base images, after tweaking in Lightroom 4.  The tweaking meant adjusting the highlights and white sliders to get a better (i.e. darker) exposure in the clouds and sky, and adjusting the shadows slider to get a better (i.e. brighter) exposure in the dark areas.

My usual Lightroom slider settings for landscapes are:

highlights = -50
shadows = +50
whites = -50
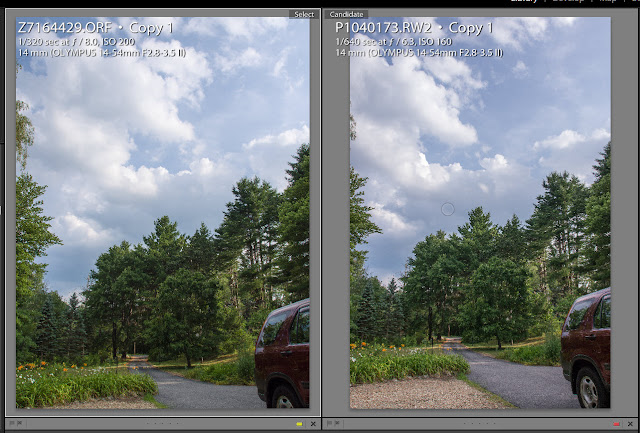
Oly on left, Pany on right.  Shooting the Pany at 3:2 aspect ratio was an error.  Both pictures were taken
in the camera's P-mode in RAW, with adjustment to highlights, white point, and shadows done in Lightroom 4.
I don't see any dynamic range differences in my final images, at the base exposure setting.


Overexpose by 1-stop

The next set of comparative images are shots taken with 1 stop more light.  No Lightroom adjustments were made to this next set of images.  Both images just barely kept all the pixels within the histogram range.  The clouds look bright, but they are not blown out. There is detail throughout.  At 1-stop overexposure the sensors on both cameras are reaching their limits, it would appear.


The next two images show what can be done in post-processing to improve these two images.  Highlights were pulled back and shadows opened up using the the highlights, whites and shadows sliders in Lightroom 4, to create very satisfactory images. The Olympus images seems to show more "haze" in the sky; but I am guessing most of that is due to changes in the sky during a short time delay as I switched lenses on the two cameras.

Bottom line: I am happy with both of these images, though I think highlights are getting close to being clipped on the Panasonic image.


Overexposed by 2-stops

At 2-stops of overexposure, the sky seems blown out on both.  Neither of the two images below seem particularly great and I thought there'd be no way I could recover any highlights in Lightroom 4.


But I was entirely shocked (and excited) when I set to work with the highlight, whites, and shadows sliders in Lightroom 4.  Look how great the recovery was with the Olympus image, below left. The Panasonic image, on the other hand is beyond repair.


Conclusion

I'm not going to sell my GH2 because of this.  (Actually, I will probably sell it when the GH3 comes out.)

I need to be practical when comparing the GH2 and E-M5.  I have 350 images from each camera from a two week trip to the Canadian Rockies.  I don't have even one example where I ran out of headroom and footroom in post-processing.  And I never had an accidental exposure where I needed to recover two stops of highlights like the examples above. I should point out that this experience was with many landscape scenes with dark pine forests and snow capped mountains. 

Having said that, this does show that there can be (IMHO) an advantage to using the histogram to add a bit of positive EV compensation.  Sometimes this is called ETTR (exposing to the right).  In so doing, you can add exposure to the dark areas before post-processing. And then, to bring back color in the sky you can pull back a bit with the Lightroom sliders that effect highlights and the white point.

With Lightroom 4 I am finding the following setting to be a good starting point for almost all of my  travel and landscape pictures:

highlights = -50
shadows = +50
whites = -50
blacks = adjust to taste and to get more/less contrast

I know there is a clamouring for more dynamic range.  I read about it in all the online forums. But I don't know how much more we really need.  I am very happy with what I have now.

In the next generation of sensors, I'd gladly give up any additional dynamic range in exchange for lower ISO's like 100, 80 or 50.

7.23.2012

Flowers from last weekend.

I've posted 39 images from last weekend on my Web site, here:

http://www.peterfraileyphoto.com/flowers2012jul14

I am really pleased with this set.  The lighting was very nice.  The sky was a milky, creamy color.  Not exactly overcast, but the light was nicely diffused, resulting in only light shadows. 

The camera was the Olympus EM-5. The first 28 images were taken with an Olympus 70-300 zoom that has a nice closeup feature.  The remainder were taken with a very old 105mm Nikon Macro lens.  All were hand-held.  No image stabilization was used other than maintaining a speed equal or greater than 1/focal length.  Because of the nice natural light, my flash stayed in the bag.

Below are just a few of the 39.  These are the ones that have "critters" on them.  I can't resist trying to photograph a bug on a flower.  Bees are my favorites.  Perhaps that is because, as pollinators, they are helpful to flowers. 

The butterfly arriving on the first flower below was a complete surprise.  I had picked this flower for a macro shot and the butterfly arrived as I was focusing, and stayed long enough for me to acquire reasonable focus, a difficult thing with this old manual-only focusing lens.


7.22.2012

4 image panorama: Sulphur Mountain, Canadian Rockies (Banff)

The building you see here is the terminal for the Banff Gondola.  This pano is the result of 4 images. What you see is a reduced size copy so it can fit in this blog.  However, on my hard drive the original measures 14,000 pixels by 4,500 pixels.  If I did the math right, that's over 60 mp. That will make a huge print!

The camera was hand-held and images were shot in P-mode. Photoshop did a nice job stitching them together.  I did nothing other than click the right buttons.  (See my instructions in a prior post.)

If you want to see a larger view of this pano plus 6 others I included in the prior two posts, I have them on my Web site in larger sizes, here. Once you are there, if you click a couple of times on any of the thumbnails they should get "big", then "bigger".


7.21.2012

3 image panorama with Photoshop CS5: Lake Louise

My prior post included several 2 image panoramas from our recent trip to the Canadian Rockies.  The 2 image approach is a good one.  The resulting pano, with a bit of cropping/trimming, will have an aspect ratio of about 2:1, which is very close to the 16:9 aspect ratio of an HD television.  The actual angle of view that you will get depends on the focal length of the lens used.  If you use a wide angle lens of 28mm equivalent field of view, I believe the resulting pano will have a field of view equivalent to about what you get from a very wide angle 14mm lens. (Someone reading this may be able to correct me on this; however in any case the resulting image is nearly twice as wide as what I can get with a single 28mm wide angle image.)  

Below I show a 3 image pano.   What makes this a bit different is that I held the camera vertically so as to get more sky and water.   This technique can result in a slightly more stretched out pano than what you see here.  However, in this case I had a greater than usual overlap in the second and third images, primarily because there was nothing I wanted to capture further right than the person in red.

This approach also makes sense if you want to make big prints.  The camera used has a 16 mp sensor.  However, because of multiple images this pano measures 25 mp.


7.19.2012

More Panoramas with CS5: Two shot panos from the Canadian Rockies

I've been working on my Canadian Rockies images and have been very pleased with the panorama shots taken.  This is really very easy.  My cameras are set up to show the 1/3 viewfinder grid.  Basically, the grid looks like  tic-tac-toe lines on the viewfinder that divide the view into horizontal and vertical thirds. 

All my panos are stitched from hand-held shots, typically shot in in P-mode.  With today's advanced software (like Photoshop CS5), auto-mode will work fine, also. 

As I move the camera from left to right (you can also do a vertical pano by moving from bottom up) I merely overlap each picture by one-third of the frame.  In other words, the right 1/3 of the first picture needs to appear in the left 1/3 of the second picture.

The pictures are then exported to Photoshop CS5.  See screenshot below.  I always check "vignette removal" and "geometric distortion correction".  The other items are pre-selected.  Then, click on "OK".  You'll need to do a little cropping on the final result, to even up the edges.  But that is all there is to it.


Here are several samples of two images panos:


From Sulphur Mountain, Banff, Alberta


Bayview, Idaho


Athabasca Glacier from the Columbia Icefields Parkway


From Sulphur Mountain, Banff, Alberta


View of Banff and the Bow River from Sulphur Mountain

6.20.2012

The Panorama feature in CS5 is awesome

I have had so much fun stitching two or three (usually no more than that) images together using Photoshop CS5.  CS5 snaps the images together flawlessly (i.e. 90% of the time, by my guess) and even blends different exposures used in each photo. 

Different exposures often result when using any of the automatic exposure modes, because the light invariably hits the scene in different amounts as the angle to the light source changes slightly each time you move the camera to take the next picture. 

Below are two images taken inside the Cabelas store in Idaho.  I used P-mode and auto ISO and simply overlapped two 24mm wide angle shots by.  No manual exposure. No tripod.  No fancy footwork required. 

[Taken with Panasonic LX5.]


The two images


Two image pano (before cropping)


5.30.2012

Front yard safari

After getting home from the office this afternoon and grabbed my camera and macro lens I trotted out to the garden in the front yard.  The first two pictures below are of (I think) a "hummingbird moth" which I discovered on the blue irises.  With it's largely clear wings, it was actually quite camouflaged.  However, I couldn't position myself to get a good angle.  I'm not sure what angle would have been better, but I don't really like either of these. 

I decided to walk around a bit more, looking for other insects.  I found a few.  The white thing was a surprise.  I've never seen anything like it.  The beetle was easy to spot though it was small... perhaps 1/2" long.  It looks like it had been chomping on the edge of the leaf it was standing on.