7.26.2013

A few July flowers w/ 90mm macro lens

I took these images about two weeks ago, before the heat wave.  Bet they're long gone by now.  I hope to get back to Tower Hill Botanic Garden as soon as we get a hazy but cool day.

These were taken hand-held with a Sony NEX6 camera body and a manual focus Tamron 90mm macro lens. With this "old" lens on the Sony body there is no image stabilization.  However, when shooting outdoors like this I like to use 1/200th second shutter speed to freeze any slight subject motion.

On the image immediately below I used the small Sony HLV-20AM flash (Guide number of 20) along with a small bounce card to spread the light. A bounce card used out-of-doors loses lots of light.  But when you are close as I was there is still plenty of light deflected toward the subject.  I used the maximum sync speed available (1/160th second).  This turned out to be fast enough to freeze the fly (but not quite the wings) of the fly/bee in the lower right corner.

Note the little flying insect in the lower right, caught in mid-air.
I saw him (her? it?) fly into view as I was pressing the shutter.
 

Bee on Poppy

Cone Flower

Day Lily

7.25.2013

A nice day on the Millers River

Just before the terrible heatwave we have just concluded,  I had an chance late one morning to do a little fly fishing on one of my favorite rivers,  the Millers River, especially the area that flows near Rt. 2 near the town of Erving, Massachusetts.  I always take along one of those little water resistant compact point-n-shoot cameras whenever I am out fishing.  In this case the camera was the Panasonic TS3.


The image quality from the TS3 are nothing really to "write home about".  The sensor is way too small but that's really no big deal as the shots I take with it are really just "record" shots.  For that purpose the quality is good enough.

These first two images below were taken with the TS3.  In both cases I was standing knee deep in the river.


The two images below were taken with the Sony NEX-5R.  This is a really nice little camera with an APS-C sensor.  It was equipped with the 16-50 kit zoom.  It's my "keep in the car" camera. The images it creates are generally a couple of steps "up" in quality compared with the little Panasonic TS3, but on images posted to a blog "the difference doesn't make a difference" in my opinion.  This is especially true when there is plenty of light, as there was on this day.


Taken from the bridge in Erving, MA

7.24.2013

On The Way Home [2013Jul24]

There was a lot of nasty weather yesterday.  The day ranged from torrential rain with dark low storm clouds, to bright sunshine and dark blue sky, to rain while the sun was shining.

While driving home yesterday afternoon I stopped along the road to take two dramatic pictures.  The first one, viewing into wetlands, was taken with the camera aimed east.  I was attracted to the dark wet dead trees offset by the low clouds in the background. The second image was taken from the other side of the road, with the camera aimed west.

What I had with me was the NEX6 with Nikkor 56mm F1.4 lens attached.  I set the aperture ring to F8, set the ISO to 100, focused manually, and let the camera choose the shutter speed.  No EV compensation was needed.


7.21.2013

Backyard Macro Safari [2013#1]

The backyard macro safari happens from time to time when I get home from work and need a little "shutter therapy". [I hope my friend Robin Wong doesn't object to me using a phrase I think he coined.]  I basically grab my camera and walk around outside looking for something to photograph.

Since there are no spanning vistas to photograph in my backyard, I will throw on a macro lens and look for something small.  I often end up with a few bugs. I call this exercise a safari because when photographed "up close and personal" bugs look awful scary and prehistoric and wild... but are actually quite beautiful and amazing creatures (critters?).  And you don't even know they are there, unless you decide to go "on safari".

There is danger involved, just as there is with any safari.  This time of year, as you hold your camera motionless, trying to lock focus while holding your breath, squadrons of mosquitoes will execute their well designed attack plans. The ensuing battle can be rather bloody, and it becomes very difficult to concentrate and to aim your camera accurately. The best sniper tactics are required.  During this last heat wave (seven days!) I found on most evenings that "discretion was the better part of valor" and I would make a hasty retreat to the safety of the house after getting off just a few shots.

It is for these reasons that the results of this last safari were rather meager, though I am happy with the dragonfly pictures.

I used two setups for these images: (1) Sony NEX6 with Tamron 90mm macro and (2) Olympus E-M5 with 60mm macro


That's a yellow crab spider on the left.  They love little
flies like the little black one that seems to be in his sights.
Crab spiders lay in wait for prey.  They do not make web nets.

Japanese beetle, as any gardener would know.


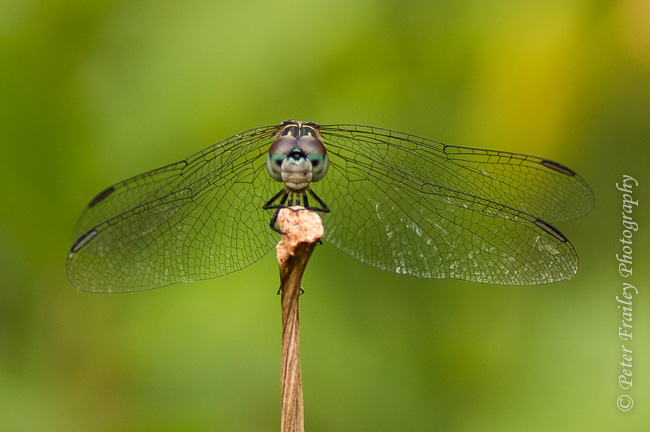
Dragonfly with prey


I believe this is some kind of nasty wasp.
It measures about 1.5" and burrows in the dirt.
(Right next to the front door!)


Another dragonfly with prey

Next time I will try to focus on the beautiful wings,
rather than the eyes.

7.06.2013

Sony NEX does blue awesomely

I am a big fan of blue.  In the 1950's I fell in love with my Dad's Kodachromes.  Most of the ones I remember where taken in the American West as we drove through the National Parks on our way to his new job on the West Coast. I remember nothing but sunny days. Ever since viewing his slides from Yellowstone, Bryce, Death Valley and Yosemite, I have loved deep blue sky and puffy clouds.  He never did use Velvia, but when using Kodachrome he taught me to under expose by about 1/3 (or was it 2/3) stop to bring out the richness of the sky.  Of course, the rest of the slide looked underexposed, but I don't think I really noticed.  Today, with digital, I am more likely to ignore his advise and to "expose to the right".


I am very picky about the color blue.  If you swing blue one way you get a magenta cast.  If you swing it the other way, it gets a bit green.  I don't like either.


On this day, I was thrilled with the results I got from the NEX.  For the images in this post, I used the NEX5r with the 16-50 kit lens. I used no filters. I own the NEX6 also, but as far as I can tell the results are identical.  I used the Lightroom landscape sharpening preset for each of them, and the first image (the only vertical image)  has a +.4 EV lightroom exposure adjustment.  I used the default color profile (Adobe Standard).  Some of the images have been cropped.  On several I used the shadows slider to brighten up the dark areas.  Other than that I did nothing in post processing.


There's nothing great about any of these images.  They were all taken yesterday along the highway while doing a day trip to Vermont to see our brand spanking new grandson.  The weather here in New England has been terrible in my view.  We are in a heat wave and the humidity is torturous.  So spending the day in an air-conditioned car and an air-conditioned hospital was a good coping strategy.  Obviously I had a camera with me for the baby, but I just couldn't help taking a "sky shot" whenever we stopped.


I am looking forward (not today) to comparing these results with what I get from my Olympus E-M5.  I know there is an entire cult of Olympus jpeg fans who say the Olympus blue is unique and spectacular.  However, I shoot RAW, and as far as I know Olympus has never shared its color profile with Adobe.  So, I am left with what I can do in Lightroom and Photoshop.  I have created my own color profile using ColorChecker Passport, but it is almost identical to Adobe Standard.


By the way, like many, I have found viewing online photos with Internet Explorer yields poor results.  On my monitor (which is calibrated), Internet Explorer makes the sky too green.  It is too saturated.  Others have said that this phenomenon occurs only when the viewer has a high gamut monitor (which I do.)  But regardless, I find that Chrome gives results that are color-accurate.

So... BEST VIEWED IN CHROME AND NOT IN INTERNET EXPLORER

As the saying goes, "your mileage may vary".  But to me, this is what blue should look like.  No green tint.  No magenta tint.


6.20.2013

Lake Everest on the Ausable River, New York


Looking upriver from the Route 86 bridge, Wilmington, NY.  Here the Ausable River is
dammed to form Lake Everett.

Behind the Scene
I just finished a week of fly fishing with four fishing buddies, along the Ausable River in the Adirondacks of New York.  The Ausable is generally a fast-moving (except above dams as shown above), rocky-bottom river that runs in a northeast direction to the western shore of Lake Champlain. The Ausable is a famous brown trout fishery.

The water this year was quite high which made for difficult wading and challenging fishing. We nevertheless caught plenty of fish, mostly brown trout but also rainbows and brookies. But we did drive around a lot looking for areas that were fishable.  While driving to Wilmington to scout out the flow downriver of the Wilmington Dam I was attracted to the view upriver from the Route 86 bridge next to where we parked.  

The dam has created a very slow moving and peaceful stretch of river called Lake Everest. It looks like it provides some relaxing fishing from a canoe.  And in fact there is a single fisherman in a blue canoe way in the distance. For us this was no more than a pretty picture, because we had come to the Ausable to fish fast water for strong trout.

The camera I had with me was the Panasonic LX5, which does a very nice job as long as I can keep it at ISO80 or ISO100.  The result is a shot that (to me) is worthy of printing and framing.  

The  above shot was taken at ISO80, F4, and 1/500 second.  I did lean my elbows on the stone bridge wall, but at a shutter speed of 1/500 second stabilizing the shot was probably unnecessary.  The clouds obviously helped greatly in making this picture attractive, as they both blocked out the bright sun that was nearly in front of me, and also provided a beautiful cloud reflection on the still water. 

There are a number of photographic elements I like in this shot.  Primary here is the rule of thirds, both vertically and horizontally.  Also, I find there are leading lines taking your eye from the foreground and up into the background.  I frequently use a vertical orientation when photographing landscapes.  In this case it helped present the cloud reflections at the bottom of the image and allowed me to pick up the blue in the sky at the top of the image. And finally, I like the "stacking" from front to back of differently exposed areas that add to the feeling of depth.

Additional Images. Same Day. Same Time.
Same Place.

Checking out the flow below the Wilmington Dam.
Due to historically high water, it would have been dangerous to
wade and fish here.

The Route 86 bridge as seen from the dam.  Wilmington, NY

My wader-clad friends admiring the view upriver

We ended up fishing elsewhere on the river that evening.  I would have loved to have come back to the same spot on the bridge at sunset, but fishing took precedence on this day!

5.20.2013

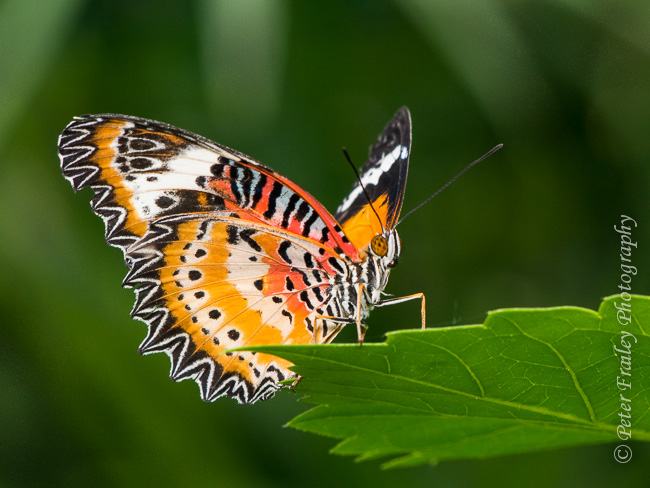
Behind the Scene: The Leopard Lacewing Butterfly

Over the last several years I have been collecting quite a number of butterfly images.  This is thanks to a nearby butterfly house.  This does feel a little bit like cheating, however.  Sort of like visiting a zoo to get photographs of African animals.  On the other hand, the local butterfly house is quite a bit cheaper than traveling to exotic butterfly havens like Costa Rica. 

One of my new projects is to identify and label my collection of images.  A favorite of mine is called the Leopard Lacewing.  In doing some research online, one Web site called this one of the seven most beautiful butterflies in the world.  Who am I to argue with that!

What I like so much about the Lacewing butterfly is the ornate underside.  This is a bold pattern with lots of dots and bars, and many colors. With a little bit of "fill flash" from a flash with diffuser mounted on my camera's hot shoe, the colors come out very nicely

This is my most recent image, taken a couple of weeks ago. I think this specimen
stands out nicely against an all-green foreground and background.
As I recall, the flip-out display on my Olympus E-M5 made it easy to hold the camera
at waist height to capture the butterfly at this angle.
1/200th; F8, ISO400 and a touch of fill flash.


Topsides the Lacewing is also beautiful and I have posted an image below showing the vibrant top of the wings.  The bright orange indicates that this is a male.  Apparently the female is a bit drab, with gray instead of orange.  I don't seem to have a picture of a female. I'll have to keep my eye open for one next time.

The Leopard Lacewing is found in India and Southern China, down through the Malay Peninsula and Singapore.

1/650th; F8, ISO400 and a touch of fill flash.
(If I were doing it all over, I'd drop it to ISO200 and 1/325th)


5.17.2013

Favorite Stuff: Duluth Trading Company's "Working Man's Vest"

I'm a big fan of Duluth Trading Company. At Christmas time, it's my primary source for useful gifts. It's not well known but their stuff is excellent, and like many classy online stores they unconditionally guarantee their products.

Last year at this time, in preparation for a two week adventure to the Canadian Rockies, I purchased a "working man's vest" on the recommendation of a colleague. I was/am very happy with this purchase. This garment has pockets everywhere, both inside and outside. There is mesh on the sides and in the back, so it feels very light and comfortable even in summer.  (Warning: they do run big.)

What prompted this post is that I received an email this week (I'm on their email list for special sale items) showing the vest for $10 off. I have no idea how long this sale runs.

Below is a screenshot from the email.


No coupon code is needed. But the $10 off only seems to work if you go to this link:

http://www.duluthtrading.com/store/mens/mens-collections/top-mens-picks/82014.aspx

If you can afford it, I recommend ordering two sizes and returning one after you try them both on.


5.12.2013

Sony NEX-5R deal of the century

I have never bought something more quickly than when I saw the following deal on Amazon, thanks to a post from another photographer on one of the Sony online forums.  In fact I ordered it so quickly that I forgot to change the default postage to the "free" shipping option.

The screenshot below is what I bought.  This is Sony's latest NEX-5 series camera.  For $328 I wonder if this was a misprint?  Regardless, they honored the price. 


This second screenshot is the same thing, as advertised the next day! This second price is pretty good, too, if you find some of the filler items in the box to be beneficial.  For me, only the second battery (a generic worth about $15) and the 32gb memory card (worth about $22) are worth keeping.

This really is one small camera.  And to think it has the Sony 16mp APS-C sensor in it!  I am not too sure I am happy with the sharpness of the 18-55mm kit lens but I can easily sell it on Amazon or EBay.  I may keep it, I may not keep it.  I'm not sure yet.

What I have done is put the "pancake" 16-50mm zoom on it, which I already own.  This makes a wonderful alternative to a compact camera.  I've tested the 16-50mm lens against my go-to compact camera, the Panasonic LX5 and found that the 16-50 outperformed the LX5 at all common focal lengths and F-stops.  This testing was done on another Sony camera, the NEX-6; however the sensor is the same on both the NEX-6 and NEX-5R.

How will I use this camera? 

At least for now, the NEX-5R and 16-50mm pancake zoom will be slotted as my "grab" camera.  I have a small padded fanny pack that is a perfect size for the camera with lens attached, spare battery, and the auxillary flash.  I do have one concern ... if any of my kids see me wearing a fanny pack, I'll never hear the last of it.  haha.

5.04.2013

Butterflies with the E-M5 plus kit 40-150mm plus Metz 50 AF-1 flash plus deflector

In April I made two trips to Westford's Butterfly Place.  I have been there quite a few times over the last few years, but find that I am still able to "capture" new varieties.  Hopefully, too, I can get better and better images of some of the varieties I already have in my growing "collection" of tropical butterfly photos.

Earlier this year I acquired for $100 a brand spanking new Olympus 40-150mm zoom for m43.  It works rather nicely with a 3 foot focusing distance when zoomed to 100mm to 150mm.  At 150mm I can fill the screen with a composition 4" across.  I usually start with the lens at 150mm and zoom out if I want to add more environment to the image.  Of course, I can always back up.

My standard lens for flower and butterflies had been the 70-300mm designed for reg43 bodies.  But on the m43 body it focuses slowly and noisily.  That's okay for flowers but not so much for things that move. The 70-300 is sharpest when zoomed to 100-150mm, and focuses at about 3 feet.  But it has slightly more magnification than the 40-150.  At 150mm I can fill the screen with a composition that is 3" across.

Nevertheless, I think the 40-150 for m43 is a better choice for me.  It focuses fast and quietly and is very lightweight, which I notice after my (typically) two hour butterfly sessions.  By the way, the 40-150 is light because it is all plastic, even the lens mount.  I'd rather have a metal lens mount, but for $100 I have nothing to complain about.  As far as I can tell the optics are excellent in the range I am using for butterflies and at my preferred aperture setting of F8.  Though I don't get quite the magnification I have with the 70-300, a bit of cropping isn't particularly problematic with the 16 megapixel sensor of the E-M5.  When I started with the 70-300, it was on the Olympus E-520 which was a 10 megapixel sensor.

I used a flash during both April sessions.  The flash is a Metz 50 AF-1 to which I attached a cheap deflector.  I also have some other deflectors I expect to experiment with.


I used manual exposure settings.  Almost always I shoot at 1/250 and F8 and whatever ISO is required to provide underexposure of about one stop.  I then set the flash at TTL.  I use flash exposure compensation if adjustments need to be made.

Below are my two favs from April.  Neither specie was in my collection so I was happy to have seen these specimens and also to have found them in perfect condition.

Emerald Swallowtail

White Peacock
The rest of the images from my two April outtings can be viewed on my Web site, here:

9 images from April 7 at

9 images from April 20 at