12.21.2012

Splicing together two kodachromes from 1966 (thank you Photoshop!)

Photoshop CS5 is so awesome.  I am almost entirely a Lightroom man, but I do go into Photoshop for three things: (1) panorama stitching, (2) the content-aware tool, and (3) cloning.  The first two features are not available in Lightroom and the third feature, cloning, is far superior in Photoshop in my opinion.

So, here is today's story:

Last weekend I was "digitizing" some of my dad's Kodachrome's from a trip to Europe we took together in 1966.  He used a Kodak Retina IIIC rangefinder camera.  With just a 50mm F2.8 lens, and film rated with an ASA of 25,  many today would view his camera as "limited" in the images it could create.  On the other hand, neither of us knew anything different, so it was quite adequate.

Visiting the Cathedral at Chartres, France we actually thought it was pretty cool that the structure was so large and tall that he couldn't get it all into the viewfinder.  I remember enjoying the slide show we created that first showed the bottom half and then showed the top half. 

When I saw last weekend that the two slides had significant overlap, I was hopeful that I might be able to splice them together into one vertical image. I didn't let myself get too hopeful about the outcome, however, once I noticed that the bottom picture was in horizontal orientation and the top picture was in vertical orientation. 

So... without doing any editing to the images, I decided to challenge photoshop.  I exported the images from Lightroom to Photoshop.  Photoshop did all the rest, automatically.  Below are the two original images and the result from Photoshop.


Next, to create a finished product, and since I couldn't crop the bottom half to fit the top half, I used the "content-aware" tool to fill in the sky in the top half.  It just took a minute or two.  I am happy about the photoshop "content-aware" tool, because I know nothing about layers and all that other good stuff that most power-users of photoshop know.

At this point I still had some fill in some additional sky.

Lastly, after saving the file as a .tiff and bringing it back into Lightroom, I made some other adjustments, such as a slight rotation of the image and some color adjustments.  I am sure more can be done, but the final image below is good enough for me (and my Dad likes it too!)


12.16.2012

Olympus E-M5 plus old Ai-S Nikkor 105 micro: samples

Two posts ago (here) I showed a few samples of macro flower shots taken at our nearby botanic garden using the Sony NEX-6 camera body plus a very old Nikon lens, the Ai-S version of the Nikkor 105mm F2.8.  Today I am posting what I believe are equally sharp macro images using the same lens on an Olympus E-M5. 


Like all the mirrorless models, both cameras can accommodate old lenses as long as the appropriate lens adapter is attached between the camera body and lens.  There are no electronics connections, so aperture must be adjusted on the barrel of the old lens and manual focus is required.

Reviews of the performance of old lenses originally designed for film cameras show that there are great variations in image quality depending on model, brand and/or focal length.  But I have been very happy with this old Nikkor Ai-S model 105mm F2.8.  (If you are interested, I see they sell for about $350 on eBay.)

On a full frame Nikon this lens is a 1:2 macro, but on a m43 camera with its 1/2 size sensor (half the diagonal of a FF camera) you get a 1:1 macro.

I've been recently comparing the image quality of this old lens on the Sony NEX-6 and the Olympus E-M5. There are differences in how the Olympus and Sony handle the old lenses.  A primary benefit of the Sony is what is called "focus peaking".  As you bring a subject into focus, areas in focus turn yellow along lines of high contrast (you can also select red or, I think, white).  Unfortunately this works inconsistently with macro shooting. 

One advantage of the Olympus is that there exists in-body image stabilization.  This results in stabilizing even old legacy lenses like this old Nikkor.  On the other hand, when shooting flowers outdoors (perhaps my primary use for a macro lens)  I like to use a shutter speed of about 1/160 to 1/250 because even in a windless day there is air movement that can create slight amounts of subject motion.  At these speeds, using a 105mm lens (with an effective reach of 160mm on the Sony and 210mm on the Olympus) I can hand-hold the camera without noticeable camera shake, without needing image stabilization.

So, perhaps the main benefits of each system (focus peaking on the Sony, and in-body stabilization on the Olympus) aren't that significant (to me) when using this lens.

There are other differences in operation which I expect to elaborate on in a future post; but first I need to shoot with both cameras and this one lens a few more times.

As you can see below, the results from this old-technology lens on a new-technology camera are very nice.  Perhaps new lenses are sharper (though nothing is currently available for Sony E-mount and Oly/Pany m43), but I doubt I would notice the difference at a normal viewing distances.  What I can say about the pictures below is that they are sharp enough me.

These were all processed in Lightroom 4, from RAW files.

[Click on the images to see a larger image, up to 1600 x 1200 pixels depending on your monitor size and resolution.]


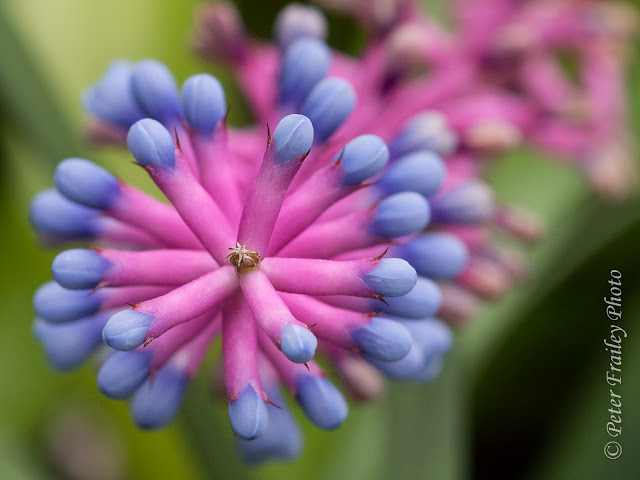
I focused on the yellow stamen tips. Any blur is a depth of field issue,
even though I shot at F8.  Shutter = 1/200.  ISO = 2000.
 
I think I was focusing on the center of this flower (i.e. the brown stamens). Most likely shot at F8.
Shutter speed = 1/200. ISO = 2500.
 
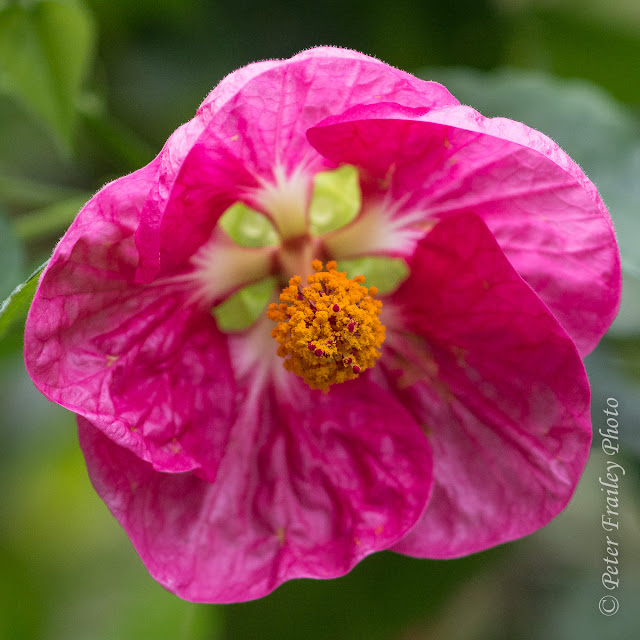
Focus was on the red stamen tips, and they are sharp.  But likely I was using wider aperture like F5.6 or F4  than I
was using on the prior two images.  Shutter = 1/200. ISO = 1250.
 

12.11.2012

The view from atop Sulphur Mountain, Banff, Alberta, Canada

The submission of the panorama below (the third picture below) to my photo club's November Salon caused me to go back to my pictures from June of this year to look again at the images I took atop Sulphur Mountain. 

It had rained the previous day and through the night.  But in the morning the clouds began to break apart and we could see that it had snowed at the high elevations.  As it turned out, the top of Sulphur Mountain had about 3 inches of fresh snow.

We took one of the early gondola rides to the top, as we worried that the clouds would return.  Fortunately, we had plenty of warm clothes.  We knew before arriving in the Canadian Rockies that June could be a cold month and that snow should be anticipated.

[Larger Images: click on any of these images to see as large as 1600 x 1200 depending on your monitor.]


The panorama below was spliced together from four individual images.  If you look carefully you can see the Canadian flag on a flagpole next to the gondola station.  The pictures for the panorama were taken about half way along a very nice boardwalk that connects the gondola terminal to an observation building. 
 

In two of the images below you can see the town of Banff. The river that runs through town is the Bow River. You can't tell from the pictures, but the Bow River was raging well above its banks. Rains had been heavy but this is also a time of snow melt in the mountains.  You can easily see the brown color of the water.