3.31.2013

Behind the Scene: Nubble Lighthouse in full daylight

As a serious photographer I am well aware of many of the "rules" of photography.  One of them is that there are two good times to make outdoor images: at sunrise and at sunset, during what are called the golden hours and which include the 30 minutes before and after sunrise and sunset.

I am all in favor of the golden hours, but on this day I decided to follow my rule of photography:  the best time to take a picture is when you are there.

In this case, we were at the lighthouse parking lot at 11:30 am and the sun was as high as it was going to get all day.  This made for dark shadows, but by using the new "shadows" slider in Lightroom 4.0 I was able to brighten up some of the rocks.

Mid-day images can have some advantages on clear days if, like me, you love blue sky and puffy clouds. A polarizer would have been nice, but I didn't have one with me.

This first image is a single image taken with a 28mm-e lens. I cropped a little 
on the left and right and a lot on the top and bottom 
to create an HD aspect ratio of 16:9. 
I've kept this version at a 3:2 aspect ratio so I could keep the rocky foreground
in the picture.  The lighthouse is on an island which is so very close to the mainland,
and this image lets you know that.
This is a 2 shot panorama cropped to HD proportions.
My 28mm-e lens didn't quite cover the area so I overlapped two images.
The main subject is a lot smaller in this composition,
but I like this version the best of the three.
Some may object to placing the buildings in the center,
but there is a certain symmetry in this picture that makes we want to keep the island and
the buildings in the center.  I think the snow draws your eye to the lighthouse first,
which is what I want. I think this images screams for a big print.


3.29.2013

Behind the Scene: Nubble Lighthouse at Day's End

This has been cropped from the 3 shot 35 megpixel panorama  (seen further below)
that I merged with the help of photoshop.
What I really like about the above scene is that it punctuated a wonderful day of skiing at Sunday River in Bethel, Maine with my daughter.  Thanks to daylight savings, after leaving Bethel at 4pm, I was able to arrive at Nubble Lighthouse on Cape Neddick, Maine by about 6:30.  This was 30 minutes before sunset. 

It was so awesome that I could spend the day skiing (a token picture below) and then hit the coast for a sunset drive.  There are not a lot of places on this earth (I don't imagine) where you can ski a major ski area and then be at the ocean photographing a lighthouse 2 1/2 hours later.


The drive was easy.  I had checked this all out with mapquest before driving from Massachusetts to Maine where my daughter lives.  From exit 7 on the Maine Turnpike (the York exit) it is only a 12 minute drive to the parking lot at the tip of Cape Neddick.  That is where this picture was taken.  The lighthouse itself is separated from the mainland by a narrow spit of water.  I'm not sure, but perhaps at low tide one can walk across.

I wasn't sure I would get a good picture. Though the sky over Sunday River Ski Area had been blue all day long, there were thick high clouds along the coast.  It was very dark when I arrived at the Cape Neddick parking lot.  But it's good to be patient.  With 15 minutes to go until sunset, the sun dropped below the cloud cover in the west and gave 5 minutes of bright light (the sides of the lighthouse and buildings seen here are facing west) before hitting more thick clouds near the horizon.

Taken 7 minutes before the "golden" opportunity seen below.

This lighting lasted no more than 5 minutes.
3 shot panorama, hand held, Olympus E-M5, 14-54II lens, F4, 1/125, ISO200

Larger images of all of these can be seen on my Web site here:

http://www.peterfraileyphoto.com/p85652418


3.17.2013

Why are the new Olympus primes ugly?

I am not sure what kind of master plan they have at Olympus for the physical appearance of their higher-grade micro 4/3 lenses.  I have no complaints about the optics. I have three of them: 45mm F1.8, 60mm F2.8 macro, and 75mm F1.8.  All these lenses are certainly sharper than I am, and I am sure the same is true for the 12mm F2 and 17mm F1.8. 

But I want my lenses to look good too!

The several lenses I have from my older reg4/3 system were neither attractive nor ugly.  They look like most of the other digital lenses around.  Below, and from left to right they are the 50 F2, 11-22, 70-300 and 14-54II. They aren't exactly identical but they could pass for brothers and sisters.  The 70-300 shows different branding.  It is generally understood that this lens was built for Olympus by Sigma but with Olympus glass. 

Neither ugly nor pretty: 50mm f2, 11-22mm  f2.8-f3.5, 70-300mm f4-f5.6 and 14-54mm II f2.8-3.5


But the new micro 4/3 lenses are a different story, or least when it comes to the lenses I own:  the very nice 45mm, 75mm and 60mm primes.  They are wonderfully sharp lenses and I am happy to own all of them. 

(Having said that, I am not really sure I need all three.  I think I am primarily a zoom guy and as such my main lens for travel and landscapes remains the relatively fast 14-54II F2.8-F3.5, albeit weighing in at over 16 ounces when attached with a lens adapter to my E-M5).

All three are different and look way out of balance (visually that is...IMHO) on the E-M5.  I don't find them attractive. In my view an all-black finish on the 45 and 75 would have gone a long way toward improving the appearance. 

The 45 and 75 are even different shades of silver.  What's up with that.

 
Ugly: 45mm f1.8, 75mm f1.8 and 60mm macro f2.8


Personally, I think these lenses look like poo on the Olympus flagship E-M5


What do I think is a  good looking lens? 

Well, I am partial to the design of the old metal lenses.   The Nikkor 58mm F1.4 pictured below is over 50 years old according to my  research using the serial number.  It's been with me since about 1975 after my dad inherited it from a friend, good 'ole Mr. Mason.  On an Olympus (see the Nikkor-to-m4/3 adapter in the picture) this lens equates to a 116mm field of view on a full frame camera.  I've enjoyed this lens taking pictures of my grandchildren in relatively passive settings, especially candid portraits.  I will certainly switch to an autofocus lens for their soccer games.

 
Handsome: Nikon Nikkor 58mm f1.4 from the 1960s.  Very nice for portraits
due to the effective 116mm field of view and sharp center.
The corners are a little soft, but I like the effect.


3.08.2013

Behind the Scene: Granddaughter pictures

Until the last year or two I didn't take much interest in "people" shots, other than to use a point-n-shoot to document events like birthdays.  But when I added a 50 year old nikkor lens to a Panasonic GH2 mirrorless interchangeable lens camera some 18 months ago I was amazed at the control of depth of field that a bigger sensor can provide.  And now, with the Sony NEX6 with a sensor that is bigger still, it is really easy to blur the background.

50 year old Nikkor 58mm F1.4 attached to the Sony NEX-6 body via cheap lens adapter


I have much to learn about people photography.  Regardless, I am having fun.

All of these were all taken last November with available light only, in a room with red wallpaper, but I am now finding fun and challenge in using bounce techniques with a single flash (the Metz 50 AF-1).  And of course, when it comes to practice, what can be more fun than photographing your granddaughter.  How can you go wrong with the subject material!


On the NEX6, with its APS-C sized sensor, the old Nikkor 58mm provides an equivalent field of view of 87mm.  Just about perfect for this kind of thing.


Since the f-stop is set on the aperature ring of the old Nikkor lens and there is no electrical connection between Nikon lens and the Sony body, I have no exif information to provide me with the aperature used.  Likely it was F2.8.  I'm not sure that was the right choice.  It blurs the background, and I like the way it isolates our granddaughter from her grandmother in the picture of the two of them reading a bit of Curious George

But I also see in the bottom image that only one eye is in focus.  Fortunately it is the nearest eye. This may not be a depth of field issue so much as a focusing issue.  Though the NEX system is blessed with "focus peaking" to help in manual focusing, it is still easy to miss focus when shooting at F2.8.  F4 might have been a better choice, but I would have had to bump the ISO to maintain my shutter speed of 1/100th second.  As it was, AutoISO in these images ranged from 640 to 2000 as the shutter speed and f-stop were fixed.


3.02.2013

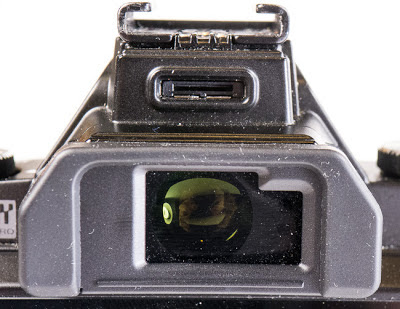
Olympus E-M5: Eyecup is a build quality weakpoint

I know I'm not the first one to lose the eyecup off the Olympus E-M5.  After all, when I called OlympusAmerica to order a replacement, they were out of stock of this $16 item. [It's still out of stock now, a month later.]  Fortunately, I found it at Adorama Camera for $10.  I ordered two.


The first time I lost the eyecup I was on vacation and taking lots of pictures, many of which were in bright sunshine in the middle of the day.  With the sun high in the sky (in was June) I would have to put my hand over my forehead to keep the sun from getting between my eye and the viewfinder.  And after trying that a few times, I switched over to my second camera, a Panasonic GH2.  I didn't view that as a downgrade, as my plan had been to alternate days with these two cameras.

Two days later I found the eyecup, in the bottom of my camera bag.  After losing it again in the camera bag I realized that because the eyecup slides down on two rails on the side of the viewfinder, like a double hung window, it easily snapped up/off if you pull the camera out of your bag with the shoulder strap.  The strap would sometimes slide up over the camera body as you pulled and this would snapped the eyecup upward and off its tracks.

Since both times that I lost the eyecup I soon found it, I didn't think much more about this camera "fault" until this winter when I realized that although the eyecup was intact, I had nevertheless lost the rubber gasket that surrounds the eyecup on three sides.  This again is a weak design.  The rubber gasket was held on with three points of glue.  I think the rubber gasket should be designed to surround the eyepiece, else it be torn off easily.

Eyecup without the rubber gasket.  Usable but I don't want
to scratch my glasses.


Eyecup slides off with upward motion


Anyway, I have now replaced the eyecup with a fresh new one, and I have one more in reserve for the next time I (inevitably) lose it.

Ah, replacement eyecup installed!  Thankfully
Adorama had this item in stock ($10).


By the way, when I called OlympusAmerica they informed me that this was not covered under the warranty and that my problem was not viewed as a manufacturing defect.  (Of course, I feel the manufacturing of the part was just fine; the real problem is the engineering).

... I still love this camera.