1.23.2014

Olympus E-M1 Journal: #12: Auto ISO with Cake and Ice Cream

I am a big fan of AutoISO and use it probably 90% of the time.  This has been especially true with the E-M5 and E-M1 because things look so good even at higher ISO's.  In fact, using the menu for setting the AutoISO high limit, I have it set all the way up to 25600. That's not to say that if this high limit is reached in reality, that I wouldn't also try something else... like turn on some lights! Seriously, though, at around ISO 3200 I'd probably put the camera on a tripod, lower the ISO a couple of stops, and slow down the shutter.  But generally, I'd rather shoot at a higher ISO than to slow down the shutter speed.

Like most cameras with manual controls, AutoISO is available in at least P, S and A modes.  With Olympus, and this has been true since the E-520, you do need to go into the menu to activate AutoISO in M mode.  By the way, I also have ISO set to show 1/3 stops. For me, these settings work nicely together. 

[Menu > cog E > ISO Auto Set > 25600]
[Menu > cog E > ISO Auto > All] 
[Menu > cog E > ISO Step > 1/3 EV] 

In the shots below I was using the M mode at a birthday party.  No flash. In this case F2.8 at 40mm on the 12-40 zoom.  With a standard zoom like this I like to use 1/125th second to freeze what little action there is (though I see the second shot was at 1/80th). Auto ISO picked 2000 in the first shot and 2500 in the second. The girls' faces are nicely lit by snow-reflected light through a bay window and by an incandescent-light chandelier on the ceiling, in an otherwise dark room.  The white balance looks good on my calibrated monitor, but skin tones are a bit yellow on my laptop.  Mixed light white balance is always a bit tricky.


Having Fun with Cake and Ice Cream

Accurate camera metering is very important when using M-mode and AutoISO because, at least with the Olympus system, there is no way to engage EV compensation (in this instance only... Note: I am just talking about M mode with AutoISO.)  For example, if you try to underexpose by increasing shutter speed from, say, 1/125th to 1/250th, AutoISO will counter-compensate by increasing the ISO by one stop.

If you find the camera is under- or over-exposing when using this set up, you will need to do one of the following:

1. Ignore it and shoot in RAW.  I feel pretty comfortable in Lightroom making exposure adjustments that are up to one stop more/less than the original shot.

or

2. Bracket your shots, and pick the best one. If the child's expression changes during, say, three bracketed shots, just take the first one and proceed as described in #1 above.

or

3. Switch from the default ESP metering to either center-weighted metering or spot metering. It may give you a more accurate exposure.  If you can meter accurately, there is no need for EV compensation.

or

4. Go to the menu to set a permanent adjustment to the exposure meter.

[Menu > Cog K Utility > Exposure Shift]

From here you can create an exposure shift up of to +/- 1 stop,  and you can do so for spot metering, center-weighted metering, or evaluative metering, or any combination thereof.  The adjustment is made in 1/6 stop increments.
or

5. Revert to manually setting the ISO.  The lever on the back of the E-M1, when put in position 2, allows the front control wheel to be available to adjust ISO. This operation is smooth, and easily done with your right forefinger. This is something that you could not do on the E-M5.  Although the histogram disappears temporarily while you are making the ISO adjustment, you do see the effect on an EV scale ranging from -3 to +3.  I would prefer to use AutoISO during the heat of action, but manual ISO will give you your desired exposure... assuming you remember to use it!

or, perhaps the best option altogether

5. Switch to A-mode (aperture priority) because EV compensation is available in this mode. For kid pictures I like 1/125sec as the minimum shutter speed necessary to freeze the action (unless we're talking about kids playing soccer, etc.)  Olympus has a setting that allows you to set the minimum shutter speed. Some have called this an "undocumented" feature because the manual only addresses its use with flash photography. What you do is use the Slow Limit shutter setting. Choose a speed up to 1/320sec.  Even if you aren't using a flash this setting will result in a minimum shutter speed. This makes A-mode very flexible.

[Menu > Cog F > Slow Limit > pick 1/125sec or a number between 30 seconds and 1/320]


1.19.2014

Olympus E-M1 Journal: #11: Out in a snow storm

The E-M1 is advertised as weather proof.  I have no reason to think otherwise. A couple of weeks ago I took it out in the cold for a few hours for the first time, walking around the historic town of Concord, Massachusetts.  I'm talking "single numbers" (Fahrenheit). The camera worked very nicely. My fingers gave me problems that day!  Even the battery worked nicely in the cold, showing basically a full charge after two hours of use.

Yesterday I decided to go out in the middle of a snow storm.  It wasn't cold.  In fact it was 36F at ground level, so the snowflakes were large and wet. The camera got wet for sure.  I wasn't out too long, however, as I wasn't really dressed for a trek in the woods.  I just took a few pictures around the outside of the house giving particular attention to a stand of three hemlock trees which looked beautiful in the snow.

This is  the only picture I liked.  It was taken with the 75mm F1.8 prime lens.  I didn't remember until I got back inside that this lens in not sealed (I think?), so I am glad I didn't stay out any longer.

75mm @ F2, 1/640sec, iso200


1.06.2014

Olympus E-M1 Journal: #10: Wide open 12-40 v 14-54

In journal entry #7 I wrote about my comparison of the 12-40 and 14-54 when shooting a brick wall.  Obviously not a real world comparison, but I do feel comfortable concluding that at F4 through F8 these lenses are (essentially) equally sharp, both in the center of the frame and in the corners.

I did not test the lenses "wide open".  So, today I went back to the brick wall to take a few more pictures. I suspected that I would see a difference when shooting wide open.  For the new 12-40 that would be F2.8.  For the old 14-54 that would be F2.8 to F3.5.

On older lenses it is often necessary to stop down a stop or two to get maximum sharpness.  But we are finding on these new Olympus lenses that they are at the sharpest right out of the chute at maximum aperture.

Well, that is exactly what happened.  I compared lenses at 14, 18, 25 and 35mm, all at maximum aperture.  On the 12-40 that was F2.8, and on the 14-54 that was F2.8, F2.8, F2.9 and F3.1 for those four focal lengths.

In all cases the 12-40 was noticeably sharper both in the center and at the edges. I won't show all 8 images but the results at 35mm (F2.8 for the 12-40 and F3.1 for the 14-54) are illustrative.

The overall scene at 35mm

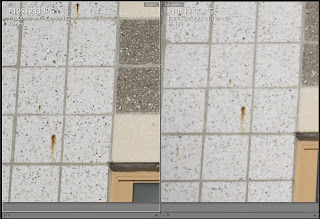
To keep it simple, I am showing below 100% crops from the center of focus, and just two corners, the upper right and the lower left.  (The other two corners gave the same results.) What you are viewing are screenshots from Lightroom 5.

In the comparison screenshots below, the 12-40 is on the left and the 14-54 is on the right.  I used the X:Y comparison tool in Lightroom 5.


Center Focusing Point.
Click to enlarge this screenshot.
12-40 on left is sharper than 14-54.

Upper right corner.
Click to enlarge this screenshot.
12-40 on left is much sharper than 14-54

Lower left corner.
Click to enlarge this screenshot.
12-40 on left is much sharper than 14-54

1.04.2014

Olympus E-M1 Journal: Entry #9: Winter (cold weather) shooting

Here in New England we've had quite a winter so far.  Since the beginning of December, Boston has received over 24" of snow total, in three storms.  I don't know what the "normal" amount is, but last year it was less than 4" during the same time frame.

This last storm dumped up to 24" all by itself, in some of the towns north of Boston and near the New Hampshire border.  Where we live, we were spared, with only 7".

Something that is unusual is the severe cold that accompanied the snow.  Obviously, one expects it to be cold when it snows.  But we've had temperatures far lower than freezing.  We woke up this morning to -6F.

Inside the house we were warm and toasty.  A comfy fire warmed us in the living room, as we enjoyed our morning coffee.


The weather forecast was for rising temps and sunshine.  Normally, I might have gone off for the day with my skis, either skiing cross country locally, or taking the short trip to southern New Hampshire.  But at -6F?  Not so much.  Even the promise of rising temperatures was not enough to move me off the couch.

Then I had the bright idea of testing out the E-M5 and the 12-40 lens, both of which are supposed to be "weather proof".  Who knows, perhaps equipped with this setup winter photography will become a new genre for me.

What I decided to do was to grab the camera, the lens, and a spare battery and head by car to the historic town of Concord, Massachusetts.  The center of the town still has an "old" feel to it, and there is a nice walk out to the Old North Bridge, where (arguably) the American Revolutionary War started.

My Little Excursion to Concord

I spent a total of two hours roaming around Concord.  As you can see, there were not a lot of people about.  When I arrived at the Municipal Parking Lot the temperature had risen to 5F.  When I left two hours later it was a balmy 15F.


The camera operated flawlessly.  It was my fingers that gave me trouble.  I used bare hands the first 30 minutes, then moved to a glove on my left hand for the second 30 minutes, and then decided I'd better learn to do winter photography wearing gloves on both hands... that is if I wanted to enjoy the activity.


Here's what else I learned:

1.  When you have no expectation for creating "portfolio" pictures, wear gloves on both hands and keep it simple.


2.  Create a customized "myset" with all your basic default settings.  For purposes of an outing like this, add 3 shot bracketing to your default settings.  I'm happy with 3-shot 1-stop bracketing.  But you also need to remember to set the drive mode to high speed sequential shooting, so that with one press (and hold down) of the shutter button you will get three bracketed shots.  If you want 2-stop bracketing, use the HDR feature instead.  Don't let the camera create an HDR image, you just want the three shots at different exposures so you can pick the best one of the three when you are home and warm.  The HDR setting is easier to use than the BKT setting because it automatically switches the drive mode to high speed  sequential shooting.  My myset default setting includes the P mode, Auto WB, Auto ISO.  I'm letting the camera do all the thinking.


3. Use the myset in "P mode".  I started out the day using EV compensation to get the "right" exposure.  Actually, this is very easy with gloved hands as EV compensation is achieved with the front dial and the forefinger.  But once I added BKT or HDR, I no longer had to even think about EV compensation.  Why fiddle in the cold trying to get the correct exposure, when bracketing will do it for me?  Basically I turned the camera into a Point  'n Shoot where I knew bracketing would give me at least one suitable exposure.


4. If you want to control depth of field, use your myset in "A mode".  I will probably use this next time now that I have some familiarity with the camera in the cold.  I didn't bother this time because I just didn't want to think about it. This was actually my first time with this camera outdoors.  As it was, the camera basically chose between F4 and F8 with the light I had to work with.  AutoISO always chose ISO 200, and shutter speeds were fast for these essentially stationary scenes, ranging from 1/200 to 1/1000.


1.03.2014

Olympus E-M1 Journal: Entry #8: The wonderful EVF

I'm a big fan of EVF's (Electronic View Finders).  I have used them on the legendary Olympus C-8080 (circa 2003 but bought by me on eBay in 2008), the Panasonic FZ-7, the Panasonic G2, Panasonic GH2, NEX-6, Olympus E-M5 and now the E-M1.  The EVFs are getting  bigger and better.

Viewfinder (EVF) on the Olympus E-M1


There are at least six features I like about the EVF on the E-M1, all of which are features that are either not found (items 2 - 6) or difficult to find (item 1) on cameras with OVFs.

Of the list of cameras above, I currently own the NEX-6, E-M5 and E-M1.  Except perhaps for the focus peaking feature which is referred to in item #6 below, the E-M1 is the best of the bunch, in my opinion.

1. I enjoy the 100% coverage provided by EVFs.  Typical consumer OVF's have a coverage of 90% or 95%.  Much less than 100% coverage guarantees that you'll need to do some cropping in post, to match the view you composed through the OVF.

2. The live view shows the changes one makes to exposure, whether that be by adjusting shutter speed, aperture, or ISO.  White balance changes are also seen "live".

3. I always use the histogram overlay. I believe the histogram is the best way to insure the desired exposure.  As you make EV compensation changes, you can see the histogram change.  I've enjoyed the Olympus implementation of the histogram ever since I first saw it on the legendary Olympus C-8080.  It's situated in the center, at the bottom of the screen which makes it easy to see without having to shift your eyes (usually on other cameras) to the lower right corner where sometimes the histogram hides a bit in the margin of the screen where it is hard for us glasses wearers to see.  [On the GH2 I vaguely remember being able to use the touch screen to customize the location of the histogram.  If that is correct, my guess is that it is also an available feature on the newer Panasonic mFT models.]

4. The viewfinder on the E-M1 actually brightens up the dark areas without blowing out the highlights.  The dynamic range of the EVF is the best I've ever used.  But my experience is only with the EVFs on the cameras listed in the introductory paragraph.

This is where some of the magic is created.  I believe the default setting
for Auto Luminance is "on".  This feature is unavailable
on the E-M5.

5. After the shot, I have my cameras set up so I can immediately review the image in the EVF,  until I half press the shutter button.  [Actually, the review time is set at the maximum of 20 seconds.  But I'm done in just a few seconds, and then the half press of the shutter gets me ready to record the next picture.]

With the appropriate review setting (use the "info" button) , you can also check out blinkies and color channel histograms while keeping the camera to your eye all-the-while.  This feature is great on sunny days, and it makes it so easy to re-compose your subject and take subsequent shots without taking the camera away from your eye.  Also, I have found it especially helpful when taking hand held macros.  Without moving the camera body from my eye, I can review the resultant image for sharpness right through the EVF, and take subsequent shots, again without moving the camera or my body.

6. Manually focussing with the EVF is a breeze, because with one click of a button the EVF will magnify the subject.  The maximum magnification with the Olympus system is 14x.  Other magnification options are 5x, 7x, and 10x.  This is a tremendous aid in focusing; though the E-M1 EVF has such nice resolution that I haven't felt a need for more than 5x magnification.  In addition, the E-M1 has "focus peaking".  The EVF (and the LCD) shows a white "shimmer"  (or black, if  you choose) around the highest contrast areas which at the very least implies that those areas are in sharp focus.  At this time, I am not yet convinced of the accuracy of Olympus's implementation of focus peaking. I need to play with it more, but at least preliminarily I prefer the focus peaking implementation on the Sony NEX-6.