1.26.2017

A Few Black and White Prints From Mpix.com

I don’t do any of my own printing.  I’m actually a bit afraid to “get into it”.  I am worried that I might like it, which would mean buying an upscale printer and supplies, learning to print on different kinds of paper, learning about color profiles, etc, etc.  It would be a huge investment of time and money.  It might also be fun.

But so far I have resisted.  Instead, when I need prints I order them online from mpix.com. It is very simple, though print-purists might question the image quality that can be obtained by uploading merely an sRGB file.  But the results are beautiful.  I’ve created awesome prints as big as 20” x 30” from my m43 gear. 

I decided last week that I needed to get some black and whites done.  Each month in my local photo club, we can submit one color print and one black and white print for judging and critique.

I have a few color prints stashed away from the last time I ordered prints. However, as of last week, I had no black and white prints that I could use for the photo club. So I smiled when Mpix emailed me a note with a coupon code for 25% off all prints. (By the way, it makes sense to buy a bunch at a time because of the $8 flat shipping charge.)

It seems to me that a 25% discount is offered several times each year at Mpix, though I don't think it is possible to predict when that will be.  If you are interested, get on their mailing list so you will know when it happens! Last year I even bought several 20 x 30" prints during a 50% off sale.  That is quite a substantial savings, as the full retail price for a 20 x 30" color print is $32.39.

Below are the four black and whites I ordered last week. The first and last ones were printed at 10 x 15" (full retail would be $7.69), the bridge photo was printed at 11 x 14" (full retail would be $7.49) and the square image was printed on 10 x 10" paper (full retail would be $4.59).

The turnaround time at Mpix is very fast. I ordered my prints on Wednesday, they were shipped from Kansas on Thursday via 2 day Priority Mail, and they were delivered to my office in Massachusetts on Monday.  The prints were packed flat and sandwiched in heavy cardboard all surrounded in plastic, inside a sturdy flat box.  I have used Mpix for nearly 10 years and have only once had a problem with a print, a problem which Mpix quickly solved (re-printed) at no charge.

Penobscot Bay from Weir Cove, Maine

Chowder and Sandwiches, Stonington, Maine
Old North Bridge, Concord, MA
Mount Saint Helens, Washington

1.23.2017

Olympus 12-100: A Visit to the Botanic Garden

After exploring the close-up capabilites of this lens and reporting on it in several prior posts, I thought this past Saturday was a good day to try out the 12-100 at our local botanic garden.  I took only the EM-1 and only this lens. A polarizer would have been nice, but I don't yet own one big enough to fit the 72mm filter size.  That's too bad, as there are a couple of images below where I would have liked to have seen what a polarizer would have done to reduce reflected light off shiny surfaces.

Nine of the thirteen images below were shot at 100mm. One image was shot at 70mm and three others were shot at about 50mm. I used 100mm wherever I wanted maximum magnification (i.e. with this lens, that means filling the screen with a subject 3-3.5" wide).

All were shot hand-held at F4 and with focus bracketed, using the in-body focus bracket feature.  The number of bracketed shots ranged from 5 to 10 (I was experimenting) and the distance between shots was set for "3" (choices range from 1 to 10).  The next time I will set it for 10 shots and a distance of "2". A lower number decreases the distance between the chosen number of shots.

I'm especially pleased with the green and orange leaf directly below. That was the result of 10 hand-held stacked images each shot at 1/15s at 100mm (200mm equivalent).  That is quite a testament to the image stabilization system of the Olympus.  My understanding is that the stabilization of this lens on the newer model EM-1.2 is even better!


1.20.2017

Olympus 12-100: The Second Thing I Do With a New Lens

As I reported in several earlier blog posts (starting here), the first thing I like to do with a new lens is to test it out to be sure it's working correctly. Since I live a short walking distance from a brick building, a brick wall becomes a good place to check out sharpness, distortion, and vignetting.  But mostly I look for consistency.  For example, if the right side of an image looks fuzzy and the left side looks sharp, then it might make sense to return the lens within the 30 day return period and to order another one.

In this case, my testing was with the newly minted Olympus 12-100 that arrived just before Christmas. In the brick wall test, I compared it to my older 12-40.  The 12-40 is already known to be a very sharp lens, and my copy has been more than satisfactory over the three years I have owned it.

If you have read the earlier post(s), you will know that the 12-100 passed with flying colors!

Once I've decided that a lens is a "keeper", the second thing I do is spend about $2 on eBay for a generic pinch style lens cap with which to replace the often expensive branded cap. Actually, at that price I usually buy two.

This was my order on eBay. With postage it worked out to be $6 for two.


I just hate the thought of damaging the original lens cap (I can't tell you the number of times I have dropped lens caps on pavement), ... or losing it. This is especially true with the beautiful caps found on the Olympus PRO model lenses.

$15 versus $3


The 12-100 takes a relatively large 72mm lens cap.  That's not large for folks using larger format cameras like APS-C or full frame.  But for me, the previous largest filter size was on the 14-54mm Olympus zoom I bought alongside my first dSLR, the Olympus E-520. It measured 67mm.

[Unfortunately, at 72mm, this also means I have currently no polarizing filter for the 12-100 and will need to buy one. This is unfortunate. In hindsight I should have bought a 72mm polarizer and step up rings years ago, and used it on all my lenses.]

1.15.2017

Olympus 12-100 Macros: A Few Specs and Details

My last two posts were about this awesome new addition to the Olympus lens line up, the 12-100mm F4.0 PRO zoom, and its "macro" capabilities.  Being able to zoom into a 3" subject is more of a close-up capability than a macro capability in the traditional sense of the word, but nevertheless this feature is so very helpful for such things as flower and food photography. (Though I have to say that most of my excitement about this lens for close up work is due to the snap-back manual focus ring that Olympus has seen fit to add to its PRO lenses.)

The chart below is the result of the testing I did while writing the prior two posts.


1.12.2017

Olympus 12-100 For Macro: Six “Macro” Lenses In One

.

Well, first let me explain my use of the term "macro". I believe the technical definition of a macro lens is that it creates a 1:1 magnification, typically based on the specifications of a full frame camera (i.e. a 35mm film camera or a digital camera with a 36mm wide sensor).  

I remember understanding this meaning only after visualizing a 35mm Kodachrome slide. Look at the image on an old slide, not what the image looks like in a slide viewer or when projected on a wall or screen.  The actual slide image is 36mm wide, but the cardboard mat reduces it to 35mm, or about 1.4”.  So, if a lens is able to capture, for example, a 1.4” caterpillar in such a way that the caterpillar fills the width of the slide, then this is 1:1 magnification, sometimes written as 1x magnification.

Interestingly, old macro lenses were often unable to achieve this magnification, by themselves.  They could only fill half the frame with the above mentioned caterpillar.  This is 1:2 magnification or .5x.  To accomplish a full 1:1 these old lenses usually were sold with an extension tube of about 1” in length.  It was attached between the lens and the camera body, to provide 1x magnification when desired.

The capabilities of the Olympus 12-100 do not approach 1:1, except at 12mm wide angle.  At 12mm, the equivalent magnification is about 1:1.7. In this case a 2.4” caterpillar would be needed to fill the screen!  But on the 12-100, the lens would need to be about 1/2” away from the caterpillar to get this magnification, which is not exactly practical. Even if you could get that close, the lens would likely block most of the light.

At 18-100mm, the magnification is less, at about 1:2.4. It would take a 3.4” caterpillar to fill the screen.  So, the 12-100 isn’t really a good option for true macro work.  But for general close up photography it’s pretty awesome. Coming to mind is food photography, butterflies, and flowers. 

Maybe the 12-100 is more of a quasi-macro. At any rate, this is why I put macro in quotes in the title of this post.

So let me get on with why I think there are six “macro” (note again the quotes around macro!)  lenses within this one zoom lens.  In my prior post I showed that the 1:2.4 magnification was basically available at all marked focal lengths greater than 12mm.  Those markings are for 18, 25, 35, 50, 70 and 100mm. So there you have it.  Six macro lenses starting with the 18mm (35mm equivalent) focal length and ending with the 100mm (200mm equivalent) focal length.

Which one to use?

With six focal lengths providing similar magnification, which one should you use?  The obvious answer is that it all depends and what you are trying to do.  I realize that the image examples given in the prior post were not too helpful in showing the differences realized at each focal length, as there was no background or foreground in the shots.  That’s because I was only showing how much magnification could be obtained at various focal lengths and at minimum focus distances.

Below are examples that show some background. All were hand-held.  Flash at 1/32 power. Aperture at F8. Ambient light at -2 EV. The focus point was the orange head of the fly. I tried to maintain the same camera angle by using the electronic level. All are at minimum focus distance.

18mm.  Note how stretched-out the scene is, front to back
and how wide the scene is in the background.
I see an orange pen and food shopping list 
in the background.

25mm.  The background is beginning to fade away.

35mm

50mm

70mm

100mm. This is a good example of the compression
of the foreground and background that is achieved with longer focal lengths.
It almost looks like the striped dishtowel was held up vertically
behind the fishing fly.


1.09.2017

Olympus 12-100 For Macro. It Focuses Closer Than You May Think.


Many of the Olympus zooms are nice for closeup work, and the 12-100 is no exception.

First, the 12-100 works beautifully with the manual focus ring. Like all (most?) of the Olympus PRO lenses, there is a snap-back focus ring that lets you operate the ring with the feel of a real mechanical focus ring.  It has hard stops on both ends of the distance scale and the travel distance from one side to the other (close focus to infinity) is 90 degrees. That’s a smooth one-quarter turn from minimum distance to infinity. It’s a bonus that the focus distance will stay right where you leave it.  Turn the camera off and then on, and your focus distance is right where you left it. All that being said, auto focus works great too!

Second, focus peaking works well at short distances.  I am not a fan of using peaking at landscape distances because it appears to me that everything is in focus, and I'm suspicious of that.  But for closeups, peaking works brilliantly.  It enables you to see a ribbon of sharp focus (I like the yellow option for the color of the area in focus) across the viewfinder or screen.  For example, if you are focusing on flower stamens from the side and from a 45 degree angle, you will also be able to see which petals are in focus to the left and right of the stamens. Because the ribbon of focus peaking has some width to it depending on your F stop, it gives you a sense of your depth of field as well, so you will also be able to judge how much is in focus in front of and behind the stamens.

Third, the relatively short minimum focusing distance designed into the lens at all focal lengths, gives a very nice magnification of about 1:2.4 (35mm equivalent), over the range of 18mm to 100mm.  At 12mm the magnification is actually better (about 1:1.7 equivalent) but to accomplish this you must be right on top of the subject and the image will be somewhat distorted (see example further below).

Minimum focus distance versus working distance:

What is interesting is how close you can get to your subject with the end of the lens.  The advertised minimum focus distance is 6” at the wide end and 18” at the long end.  But I quickly realized that this is the distance between the subject and the sensor.  The “working distance”, which is defined as the distance between the front lens element and the subject, is much less.  I found at 12mm I could fill the frame with a 2” wide object, but the actual working distance was about 1/2”.  On the other end, at 100mm I could fill the frame with a 3-3.5” subject at a working distance of 9”.

Here are samples shot “as close as I could get” at 12, 18, 25, 35, 50 70 and 100mm.  

12mm.  Lens element is 1/2" from the ruler. Major distortion obvious.
Perhaps I could have focused better, but there seems to be some field curvature here,
as the edges seem sharper than the center.
The dark corners in the upper right and left are merely from the wide angle seeing
past the edges of the white paper I used behind the ruler.

18mm.  Working distance is 1.25"

25mm. Working distance is 3"

35mm. Working distance is 4.5"

50mm. Working distance is 5.5"

70mm.  Working distance is 7.5"

100mm.  Working distance is 9".

At first it seems that it makes no difference what focal length you use, from 18mm to 100mm.  However, not considered in this experiment is the background and depth of field.  The relationship between the subject (the ruler) and the background (of which there is none here) will change depending on the focal length.  At 18mm there will be more background visible (or blurred) from left to right because of the wide angle nature of the lens and larger depth of field.  At 100mm there will be less background from left to right and it may be blurred (often a good thing) due to the smaller depth of field. Distractions in the background are expected to be more prevalent at 18mm than they are at 100mm.


1.08.2017

Olympus 12-100 v. Panasonic 35-100 v. a Brick Wall

This is basically a continuation of the testing I am doing on the new Olympus 12-100 F4 lens.  In a previous post I compared it with the Olympus 12-40 F2.8 zoom.

On the Olympus E-M1, I shot with the Olympus 12-100mm F4 zoom and the Panasonic 35-100mm F2.8 zoom at 35, 50, 70 and 100mm, using F4 and F8. That’s eight images with each lens. I then compared the four corners and the center of the comparable 12-100 and 35-100 images. I shot in raw and did not use a tripod.  Shutters speeds were fast, about 1/400s for those shot at F8 and 1/800s for those shot at F4. 

Because this was a brick wall experiment at about 50 feet, some might criticize it as a less-than-useful experiment because it is not a "real world" situation. I understand this argument. After all, how often in real life is one interested in only one two-dimensional plane within a three-dimensional image. Nevertheless, primarily to be sure a new lens is working properly, I most often conduct a brick wall experiment during the 30-day return period available when purchasing from Adorama or BH Photo (and perhaps others).

So you can visualize the experiment, here is the brick wall at 35mm:


Below is 50mm:


Below is 70mm:


Below is at 100mm:


I downloaded all of the photos to Lightroom and compared them side-by-side using the X:Y tool.  At 1:1 magnification I could see no difference in sharpness in the center or corners! Since the 35-100 is already known as a very sharp lens, by association this suggests that the 12-100 is likewise sharp over the 35 to 100mm range.  (And I already know —see prior post— that the 12-100 goes head to head with the very sharp Olympus 12-40 over the 12 to 40mm range.)  

This is all good news for the 12-100. But I wanted to check it out with additional magnification to see if I could then see a difference.

So, I compared the images at 2:1.  This did allow me to see some differences.  The overall result is that the Olympus did better most of the time, but the results were very close and were not consistent. In the real world, I am confident that the differences will not make a difference.  Here is what I found with the two lenses:

Centers:  

In total I compared 8 image centers for each lens.  That images were at four focal lengths and at two F stops.  As far as I could tell, the lenses were equally sharp in the center.

Corners: 

The 32 corners were a different story. At 35mm, 50mm and 70mm, and at both F4 and F8, I compared 24 corners and the Olympus corners were generally sharper.  My tally shows that Olympus had 15 sharper corners (screen shot below is typical); the Panasonic had 4 sharper corners (but it is impossible to see the difference on a blog-published jpeg compressed screen shot so I am not showing any); and 5 corners were “tied”. 


Lower right corners viewed at 2:1.  They do not exactly line up, as I did not use a tripod.
However, as I mentioned, centers were equally sharp throughout these comparisons and I
don't believe therefore there was any camera shake.  These two images were taken at 1/800s,

so again I don't think camera shake was a factor.


The story changed again at 100mm. Here, Panasonic was the winner, as it was sharper (marginally) in 5 of the 8 corners.


Summary:

Centers: Equal
Edges: Olympus 18.  Panasonic 9.  Tied 5.

Thoughts on Purchasing:

There is really no clear winner.  If there were, only one would be selling and the other would stay on the shelves.  To me the disadvantages of the 12-100 are worth the cost. But of course I can only speak for myself.  I would choose the 12-100 over the 12-40/35-100 or 12-35/35-100 combo if I were starting fresh.

On the negative side, the 12-100 is more expensive, larger, and heavier.  I don’t like the fact that it telescopes when zooming, where the Panasonic 35-100 zooms internally.  But on the other hand, I believe this telescoping design is what allows it to provide a 1:2.5 close up magnification. I also like that the 12-100 combines two useful focal lengths  (either the 12-40/35-100 or 12-35/35-100) into one lens. I find changing lenses a real hassle.

Overall I think the 12-100 wins on sharpness, being equal to the 12-40 and being sharper overall than the 35-100. But the differences were only seen at 2:1 magnification.  This should not make a difference in real world photography. Assuming proper technique, no one will ever say your images aren't sharp enough, with whichever lens you use.  On the other hand, with the 12-100 you give up the F2.8 aperture. F2.8 is so nice when working indoors when only ambient light is available. However, since I am mostly a landscape and travel photographer, F4 as the largest aperture is perfectly fine with me. For depth of field purposes I usually shoot mFT cameras at F4 to F8. Indoors I can switch to an F1.8 Olympus prime which does more than one stop better than F2.8 and more than two stops better than F4 in bringing light to the sensor.

After landscapes and travel, close up photography is a favorite.  Like the 12-40, the 12-100 has a very nice close up capability, making it quite handy for flowers, butterflies and food, for example.  At the closest focusing distance at focal lengths from 25mm to 100mm, I can fill the frame with a subject 3-3.5" wide.  This represents an approximate magnification (35mm equivalent) of 1:2.5. The pull-back "clutch" style manual focus ring is gorgeous.  It turns the focus ring into a mechanical style manual ring with hard stops at both ends of the 90° range of movement. This feature works very well with focus peaking. 

For closeup work the 35-100 is lacking (comparatively). It's advertised magnification is  1:5 (35mm equivalent). The smallest subject that can fill the viewfinder with this magnification is approximately 6-7" wide. 


1.05.2017

Olympus 12-100 v. Olympus 12-40 v. a Brick Wall


On the Olympus E-M1, I shot with the Olympus 12-100mm F4 zoom and the Olympus 12-40mm F2.8 zoom at 12, 14, 18, 25, 34 and 40mm, using F4 and F8. That’s twelve images with each lens. I then compared the four corners and the center of the comparable 12-100 and 12-40 images.

Because this was a brick wall experiment at about 50 feet, many might characterize it as a worthless experiment as it was not a "real world" situation. I understand this argument. After all, how often in real life is one interested in just one two-dimensional plane within a three dimensional image? Nevertheless, primarily to be sure it is working properly, I do this little experiment with any new lens during the 30-day return period when purchased from Adorama or BH Photo. 

So you can visualize the experiment, here is the brick wall at 12mm:


And here it is at 40mm:


I downloaded the twenty-four photos to Lightroom and compared them side-by-side using the X:Y feature.  Let’s make this real simple:  At 1:1 magnification I could see no difference whatsoever!  

I am so pleased with that result.  I had been ready for a small compromise in image quality in exchange for an 8X zoom range; but, it doesn’t look like there will be any loss of quality, at least when used in the F4 to F8 range.

I then compared the images at 2:1 magnification.  The first time viewing it seemed the 12-100 was sharper than the 12-40 at 40mm and that otherwise they were identical. But the second time viewing, due perhaps to somewhat different lighting in my computer room, or perhaps flip flopping the side-by-side images from the left to the right side of the computer monitor, the images this time seemed identical. Go figure! I think I’m starting to split hairs, and my eyes are beginning to cross. I think this is another case of too close to call.

Purchasing thoughts:

I think if I were starting from scratch with mFT I’d buy the 12-100 and not the 12-40.  The faster aperture of the 12-40 is appealing, but the 12-100 has a bigger zoom range.  Perhaps I’d supplement the 12-100 with a couple of the Olympus primes for those situations where a bigger aperture is desired.  If I were to pick two primes they would be the 25mm F1.8 first and the 45mm F1.8 second. On the other hand, to keep within a tighter budget, I’d buy either an Olympus 14-150 or Panasonic 14-140 travel zoom as my first zoom lens. Then, if there is any money left, I'd make the 25mm F1.8 my first prime lens.

1.04.2017

Just Received the new Olympus 12-100mm F4 PRO zoom


Three days before Christmas my BH Photo pre-order was filled, and I received the lens via UPS the very next day! 


If you own any of the Olympus PRO lenses you’ll will know just how gorgeous this lens is.  It’s solid, though perhaps a bit heavy if you are used to something lighter.  But with the RRS base plate that adds 10mm in body height to my E-M1, the balance feels reasonable.  This is because the RRS base plate creates enough extra height to provide a gripping place for my pinky finger, thereby engaging my full hand in holding the camera body. 


The metal focus and zoom rings with metal ridges and the wonderful clutch style manual focus ring just ooze old-style classiness.  [My wish list: I’m am so waiting for the day that Olympus produces a PRO macro lens with this same clutch (snap-back) focus ring.  If I had my way, they’d start building a 90mm PRO macro right away (180mm fffl !]

I have just tested this lens for sharpness against my Olympus 12-40 F2.8 PRO and my Panasonic 35-100 F2.8.  It was a "brick wall test" described further below.

Minimal length.  Interestingly the 12-40 is at minimum length at 18mm.

Maximum length.  Note: the Panasonic 35-100 has internal zooming. 


I am quite pleased with the image quality of the 12-100 compared with these two other lenses. Check out my follow up posts. The first comparisons were performed while standing 50 feet from a brick wall.  Obviously not a real world situation.  After all,  how often do we make photographs where we only care about one single focal plane?

But…


I try to do a brick wall test with every new lens, during the 30-day return period provided by high quality vendors like BH Photo and Adorama.  Had I done this with the first Olympus lens I bought in about 2009, the 14-54 v.2, I would have had time to switch it for a better sample before I went on a two week vacation to the American southwest.  As it turned out, as I recall, at about F4 at a couple of focal lengths the right one-third of my images were blurred.  As a result, some of my best images cannot be printed large. That would upset any serious photographer. The brick wall test would have shown me this beforehand!

1.01.2017

Grandchildren at Christmas With Sony Gear


I tried a new camera and lens combination at Christmas this year.  I've had the Sony a6000 for two years, but the zoom I used on Christmas was a new addition to my Sony kit.  It's the full frame FE mount 28-70mm F3.5-F5.6  kit lens. On eBay I bought it supposedly "used"  for $250. If it had indeed been used it would be a surprise to me. It was pristine and the metal lens mount showed no scuffs or marks, which suggested to me that it had never been mounted on a camera. With an effective focal length of 43-105mm on the cropped a6000 sensor, it was the perfect thing for indoor family Christmas shots. 


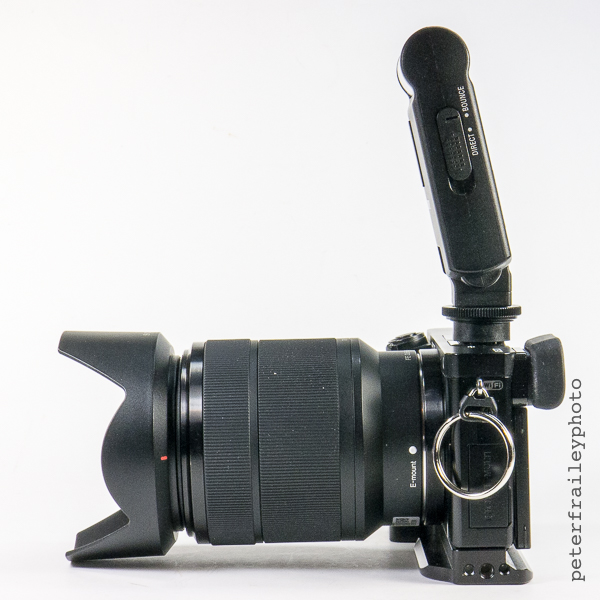
I have reported in previous posts about how much I like the Sony a6000 (and NEX 5R and, prior to the a6000, the NEX 6) for flash photography. This is because of the little Sony branded Guide No. 20 fold up/down TTL flash that is small and barely noticeable, but which bounces light nicely off the ceiling.  (Unfortunately it does not swivel.) The model is HVL-F20M.  It’s not very powerful, but that is fine with me as it is small and light and has enough juice coming out of the two AAA batteries to create a well balanced (with respect to lighting) image, as long as the ceiling isn’t too high.

Flash is folded down in "off" position.

Flash flipped up to "on" position. Note slider for bounce versus direct.
I have always only used the bounce position.
This angle can not be adjusted.  Camera is aimed to the left.


The combo worked like this at Christmas: 

Using M mode, I set the camera aperture to F3.5 (wide open when zoomed out to 28mm), and the shutter speed was set to 1/100s.  Being a variable aperture zoom, as I zoomed in and out, the aperture varied between F3.5 and F5.6.  I set the ISO to Auto.  With the flash folded down in the “off” position, a typical ISO picked by the camera’s exposure meter was 3200.  But flip up the flash to the “on” position and the ISO dropped in half.  In other words, in this example, ISO dropped one stop to 1600. This cut the ambient light (i.e. light already in the room) in half and the flash “filled in” the missing half of light. This meant ambient light and flash was balanced in a 1:1 ratio.  All I had to do was point and shoot.


In summary:  In the above example, if I turn the flash “off” my exposure was 100% from ambient light and ISO 3200. If I turned the flash “on” my exposure was 50% from ambient light and 50% from flash at ISO 1600. 

I love this simple approach taken by Sony in-camera software.  Except perhaps to the most experienced photographer, the resulting images don’t look like a flash was used… at least in my opinion.  Yet the flash brightens the subject by directing (bouncing) light onto the subject. This improves the overall quality of the light, while at the same time improving image quality by reducing the ISO from 3200 to 1600.

A few of my snapshots from Christmas are below.  All were taken with a 1:1 balance between ambient light and flash.