4.26.2014

Olympus E-M1 Journal: #15: Focus Peaking with 90mm macro

I have now used my 90mm Tamron macro a number of times for flower photography.  On the E-M1 this is a manual lens, with aperture ring and manual focus ring.

I go back and forth on the beneficial use of Olympus' implementation of focus peeking.  Yesterday outside in the botanic garden, in bright light, in worked just fine.  However, during the winter and indoors at the botanic garden it seemed to be inconsistent.  Generally it worked inside, but as I recall it only did its peeking "thing" well when I focused on lines of high contrast.


I do think, however, that focus peeking works better for me than not using it... at least for closeup work.  I think this is because with focus peeking I am finding I do not need to magnify, while without peeking I need to use the magnification feature to focus accurately.  I don't like the magnification view because I loose track of my overall composition.  Yes, the magnified view does "snap back" to full view when the shutter is half pressed, but it feels like I've just lost my focus by the time I press the shutter all the way.

By the way, my E-M1 is set for focus peaking in white.  Black is also available.


On the wish list for the next E-Mx model

Overall, I don' feel like complaining about focusing adaptive lenses on the E-M1, as the experience is improved over the E-M5.  In Olympus' next version (E-M1 mark2 ?) I would like an even bigger viewfinder, like the one found on the Fujifilm X-T. Fuji's EVF also shows a split screen.  The way it has been described to me, on one side is the full image and on the other side is the selected magnified area.

Alternatively, why not take the approach I seem to recall on either the Panasonic GH2 or G2?  What I recall was a magnified (and smaller) view superimposed on the full view.  The superimposed view consumed the middle of the EVF, allowing you to view the perimeter of your full view composition.

With either approach, my further preference would be an option that the magnified view "stay with you" until the shutter button is fully pressed.

My comments about today's pictures

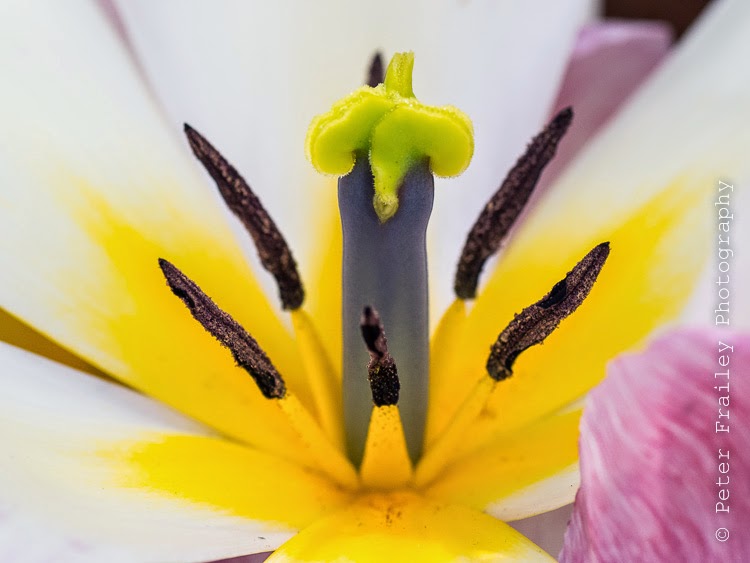
The two above and the four below were all taken with the 90mm Tamron.  As far as I remember all were taken wide open at F2.8.  

(One of the disadvantages of using adaptive lenses is that there is no electronic communication between the lens and camera, thus leaving me with no exif information about the aperture I used.  And, of course, months down the road I won't know what lens I used unless I take notes.)

I think this older lens is very sharp.  But at F2.8, though I think all of these are in focus and shutter speeds were quite ample for eliminating camera shake or subject movement, I think that I might not necessarily have ended up with focus where I wanted it.  For example in the flower below, a close 100% view showed me that the yellow center is in focus but it might have been better to have the stamens in focus... they appear a bit soft to me. Getting your focusing point "just right" is difficult at F2.8 when you are hand-holding the camera, as depth of field is so narrow.


A couple of solutions come to mind:

1) Use a tripod to eliminate any fore-and-aft movement I am likely to impart into the transaction during the brief but important moment that I fully press the shutter... but I hate tripods.

2) Forget about shooting wide open, and instead go for the greater depth of field I can get with, say, F8.  That way, it is harder to miss sharp focus on the desired areas.

Quite the quandry.

Here are three more sample from yesterday.


4.15.2014

Rokinon 12mm F2.0 for NEX just arrived


[This is my first post on the new Rokinon 12mm for Sony NEX]

A couple of really fun things have happened this week.  First, on Monday morning I read a very positive review of the new Rokinon 12mm F2.0 manual lens which comes in a Sony E mount (I've got it on my NEX6) and X mount for Fujifilm.  

I've never had a lens wider than 24mm-e and on the Sony this 12mm lens will give me the equivalent of 18mm.  Anyway, I made a spontaneous purchase from Adorama on Monday, and voila... here it is pictured below in my office at 11 a.m. on Tuesday.  Knowing how fast Adorama is when it comes to delivery to those of us living in New England, I even brought my NEX6 into the office thinking it might be delivered in one day.  And it was!  

So far, the lens feels wonderful.  Solid but less than 6 ounces.  Length of 2 1/4".  Price of $400.  Did I say it had an F2.0 maximum aperture?  That is a couple of stops faster than the zooms out there available for the NEX system and for the Olympus system (I'm a big Oly fan, but still like my NEX6.)

The second incredible thing is that though I am writing this on my office computer, I uploaded the pictures from my iphone.  No big deal for most of you.  But I just got my first smart phone about a week ago.  I took these pictures with it and thought to myself... how do I get them to my blog in the cloud?  Well it was as easy as hitting the App Store icon on the iphone, searching for Blogger, and downloading the App.  AWESOME!

Now that I have gotten over my excitement about getting this new toy (the lens) and getting to love love love my iphone, I hope this lens turns out to be a winner.  I do have 30 days to decide if I will keep or return.

I'll post more of my thoughts on this later.  In particular, my thoughts (and wonderment) as to why I am trying to use my Sony NEX when there are soooo many good (and generally better IMO) lens for the Olympus E-M1 and E-M5, both of which I own (though the older E-M5 might find itself on the chopping block soon.)


4.13.2014

Inside at the Botanic Gardens

Over the weekend I needed some shutter-time.  Saturday was gorgeous and near 70F, so I decided to spend a couple of hours at our nearly botanic garden, Tower Hill Botanic Gardens.  I put several lenses in my pack, but decided when I arrived to use an old 90mm Tamron macro lens, with an adapter for my Olympus E-M1. On an Olympus, this gives the lens an effective reach of 180mm, which is very handy, especially outside where you must stay on the garden walkways.


I was having so much fun (challenge?) manually focusing with this mechanically focusing manual lens, that I never switched to any of my other choices.  Even the superb Olympus 60mm macro stayed in my bag.


All of these shots were taken at full open aperture of F2.8.  The result is a very narrow depth of field... some people like that effect, others prefer the larger depth of field obtained by shooting at a narrower aperture.


The camera was hand-held. Focusing was manual, using the magnification and focus peaking features on the E-M1.  I have to say, getting accurate focus was difficult.  I shot at high enough shutter speed to eliminate camera shake; however, with a narrow depth of field many of the images were not focused where I intended.  I discarded a lot.

[Note:  My gut feeling is I get a higher keeper rate, with regard to focus, when using the Olympus 60mm macro mFT lens with autofocus and the small focus points.]


3.26.2014

Olympus E-M1 Journal: Entry 14: The useful 4:3 aspect ratio

I realized over the weekend how much I enjoy the native 4:3 aspect ratio found on the Olympus E-M1.

This aspect ratio isn't unique to this Olympus model, as it is the native aspect ratio used in all the interchangeable lens cameras (both dSLRs and mirrorless models) built by Olympus and Panasonic. It is also the most common format in point and shoot cameras. The more frequent aspect ratio found in interchangeable lens cameras is 3:2, which is a bit more rectangular. With some recent exceptions, the 3:2 is what you will find with interchangeable lens cameras from Canon, Nikon, Sony, Fujifilm, Samsung, and Pentax.  This is also the aspect ratio of 35mm film and slides.

Both aspect ratios have their followers.  I find the 4:3 is excellent for people pictures. I like 3:2 for most landscapes.

I was thinking about the two aspect ratios this past weekend while taking many pictures indoors at a family gathering. In many ways this post is not a story about my Olympus, because instead of using my E-M1 with the 45mm (90mm-e) lens, I chose to use my Sony NEX6 with a Sigma 60 mm (90mm-e) F2.8 lens.  I love bouncing the little pop-up and pull-back flash of the Sony when all I need is a "hint" of flash.

[If I had been really serious, I would certainly have brought the Olympus with either my FL-36R flash or my Metz 50AF-1 flash.]

The Sony produces 3:2 aspect ratio images.  4:3 has to be cropped from this in post processing.
I decided to keep 55 images. I cropped most of them (40) to 4:3 in lightroom.  To my way of thinking, most of my family pictures can benefit from a bit cropped off the sides.

Like many people, I am often reluctant to crop a picture; after all, it means eliminating data which I had collected.  But when I am done, I find it best to look at a cropped image with a fresh perspective... by pretending it is the original.  I then ask myself, "Is there anything missing in the image".  Almost always the answer is "no".

Below are some examples, before and after.  Your mileage may vary, but I think the squarer 4:3 looks better.  Unfortunately the cropping reduces the 16mp image of the Sony to 14mp.  That's no big deal, especially since none of these will likely ever be printed... and if they were, I doubt the size would be any bigger than 8" x 10".  Nevertheless, if I had used the Olympus I would have a 16mp image with a 4:3 ratio right from the start.


3.17.2014

Flowers at the Botanic Garden: Olympus 60mm macro at F2.8

I spent a relaxing hour at our local botanic garden.  These were all taken indoors with the Olympus E-M1 plus 60mm macro set at F2.8.  The first three were done with a touch of flash (about 1 stop). ISOs ranged from 200 to 800.

Most folks around here are absolutely ready for the spring to arrive, and for the blooming that will soon be all around us outside.

Detailed EXIF information can be seen along with larger images on my Web site, here:
http://www.peterfraileyphoto.com/towerhill2014mar15


3.14.2014

Three images for the March "salon"

Every month from September to May I have fun picking a few images for my photo club's monthly "salon". Though I submitted these images, due to a terrible cold last week I was unfortunately unable to attend the critique session.

This month's assigned topic: "reflections"

Penobscot Bay Sunrise


Two images for the "open" category:

Backlit Tulip

"Great Orange Tip" butterfly

3.07.2014

Olympus E-M1 Journal: Entry #13: AE bracketing usability improved

I remember being annoyed with the bracketing function on the two Olympus dSLRs I previously owned, the E-520 and E-620.  My E-M5 is just as annoying, but the E-M1 brings a breath of fresh air to AE bracketing.

It is with bracketing that the tremendous feature set and customizability (is that a word?) of Olympus cameras got in the way of my shooting with the 520, 620 and M5.  The reason is that it took two settings to turn on bracketing.  The E-M1 has the same two-settings requirement but gives us a couple of direct or dedicated buttons to quickly turn bracketing off and on.  (BTW, I think I read that there is a direct button for bracketing on the more advanced and discontinued Oly dSLRs, namely the E-30 and E-x series.)

On the E-M5 (and E-M1), to turn on AE bracketing of 3 shots at +/- 1EV requires about 11 clicks into the menu.  This is crazy.  I could never understand why it isn't at least a choice in the Super Control Panel. That would save about 10 clicks.

After those 11 clicks you would think you would then be ready to bracket your shots.  Well, yes and no. If your camera is set for single shot drive, you will need to press the shutter button three times (or, 2, 5 or 7 times, depending on which bracketing choice you picked).  However, if you want sequential shooting (i.e. press the shutter once and get three images), there is more to do.

You need to now go into the menu (slowest choice) or the Super Control Panel (the SCP is the faster choice) and then choose between high speed sequential shooting or low speed sequential shooting.  I always pick high speed on the E-M5; but not on the E-M1 (I'll explain later).

There.  You're done.  Hopefully the scene hasn't changed while you've been activating sequential bracketing!

That's the bad news.  The good news is that there is a workaround.

Want to speed things up?  You can use the camera's "Myset" functionality. I created Myset #1 with all my default settings minus bracketing. Myset #2 was then set up identically to #1 except with bracketing and sequential high speed shooting added.  Voila.

Now enter the E-M1.

Great improvement.

First, let me say that I am happy that I have had experience with several Olympus cameras.  They are very complicated tools.  The E-M1 has added even more features, so I can't even imagine how hard it is for first-timers to set up their new Olympuses.  With AE bracketing with sequential shooting two setting are still required, but implementation in the field has become easier, as there are two new ways of activating your preferences.

Method #1

Assign a function button to bracketing.  I've picked the top function button on the front of the camera.  I assigned the bottom button to HDR.  (I will address the HDR function in a future post.)  The only way I can remember which is which is that the "B" in bracket comes alphabetically before the "H" in HDR, so bracket is at the top.  Makes sense to me.

These are the two programmable buttons in the front of the camera.
As you aim the camera, they are to the right of the lens.

Currently I have the top set to "bracketing" and the bottom
set to "HDR".


One thing to note is that when you activate bracketing with a function button there is no further action available. I am happy with this. What you get is whatever you previously set up as a preference deep (11 clicks) within the menu. Mine is set for 3 images at 1EV increments.  If you want to change, say, to 5 shot bracketing you will need to go back into the menu to make the change.

Ah, but  there is still some bad news. As with the E-M5, you must go into the menu or SCP to pick sequential shooting!

To make this all easier for me, I have come up with a strategy:

When I use bracketing on the E-M1 I am only trying to get the best exposure to work on in post processing.  I'll keep one image and likely delete the others.  Sequential speed is therefore not important, as I am not trying to do HDR with the bracketed images.  For HDR, I will use the new HDR function (subject of a future post).

This is what I have done to make bracketing a one-button operation:

My camera is set for slow sequential shooting at all times, at 3fps.  This is slow enough so in normal shooting I can get one shot off at time if I wish.  So now, if I press the bracket function button I don't bother to change the drive mode....  I just live with 3 bracketed images shot at 3fps.

Method #2

I don't find this second method as easy as method #1; however, it uses a button already dedicated to the bracketing function rather than "wasting" one of the programmable buttons required for method #1.

On the left side of the top plate is a round button that looks like an old film-winding mechanism.  (See first image below.) But in this case it is essentially a round toggle button, to be pressed downward at the front or at the back depending on the desired function. But the function chosen also depends on the 1:2 lever on the right side of the camera. (See second image below.)

To turn on bracketing you must (1) have the lever in the 2nd position and (2) press down on the front half of the round toggle button.  So far, when I try this method I forget to first move the lever, as in most cases it is in the 1st position, where it is needed to use the two control wheels to control exposure.

The round toggle button on the left is reminiscent of the old
film winding mechanism.


I find this a bit awkward.  Even if I remember to first move the lever to the 2nd position to activate bracketing, I then need to move it back to the 1st position to be able to control exposure settings.  Then, when I am ready to turn bracketing off, I need to switch the lever back to the 2nd position, press the front of the round toggle button, and then return the lever once again to the 1st position.

All-in-all, I am enjoying method #1 more.

But either way, I am grateful for these "upgrades" when compared with the prior Olympuses I have owned.