4.21.2017

Photo Story: To Spritz Or Not?


When I first became interested in flower photography, it never occurred to me to do anything artificial to the flower.  I was amazed when one friend told me of clipping a flower with stem, and bringing it indoors to photograph without wind and with controlled light and with an artificial background (ex. white foam board or black velvet fabric).  What a great idea that was. That strategy for creating good art had never occurred to me.  Another friend told me about using a spritzer bottle in the field to add the very appealing effect of raindrops or morning dew.  


"Droplets"
Olympus E-M1 plus 60mm F2.8 Olympus macro
1/100sec @ F8, ISO 200

I definitely like the raindrop effect. It gives a little “something extra” to the image. But I have never actually taken the additional step of procuring a spray bottle and adding it to my gear bag.  

So, this image is completely natural.  It was taken outside my home after, you guessed it, a real rain shower. Perhaps a spritzer bottle in the hands of an experienced spray bottle aficionado could duplicate the appearance, but I’m thinking that may not be possible. I love the way the raindrops have lined themselves up nicely along certain lines on the blades of grass.

I do think that during this coming season of outdoor flower photography I will add a spray bottle to my kit.  It's worth playing with, and it should add some fun. On the other hand, using it seems a bit like catching a stocked trout instead of a wild trout. The wild trout is definitely a higher quality experience. Yet, it should be said that a stocked trout is better than no trout at all!

4.19.2017

Photo Story: 8-Year Olds Love Chalk


Give an 8-year old some colored chalk and a paved driveway and it’s all about art and creativity. 

I think the above was the best of a ton of images I took of our granddaughter during her stay with us Monday and Tuesday. The background and foreground give a sense of the environment, without being distracting (IMO). I think that is a good thing. The 90mm F2.8 lens helped a great deal with blurring the background to help focus attention on the smiling 8 year old. Some vignetting might be useful, but I don't seem to use that technique much.  I feel I captured “the moment” here, and I especially like that it was done with an old manual focus, aperture ring manual lens.  

I used a 90mm Tamron F2.8 Macro (at F2.8, 1/500sec, ISO 100) mounted on a Sony a6000.  I am always pleased when I can get good focus with any manual lens; although, of course, our granddaughter wasn’t exactly in motion!


What was really amazing about this artistic experience is that we gave her the option to go to our local ice cream parlor for an ice cream cone before returning her to her parents, and she actually asked, “can I finish up my art project instead?”  Amazing girl.

BTW, buy triangular chalk sticks for your kids or grandchildren.  We’ve concluded that they don’t break as easily as the round ones. Ours are called “Chalkables”, and we just ordered more from Amazon.  The brand is OOLY.  They come in a box with 8 colors.

4.09.2017

Gear: Best $11 Gift I Ever Received (For Macro Photography)


I saw one of these folding stools a couple of years ago at the gym.  I immediately fell in love with it and thought it would be great for my macro photography.  I mentioned it to my wife a few days before my birthday in 2015 and as I was opening birthday cards on a Sunday morning, a U.S. Postal Service truck pulled into our driveway and delivered a Rhino II folding stool!  Wow.  What a surprise.  My wife had ordered it on a Friday and with her Amazon Prime membership got it delivered on Sunday! [Apparently, Amazon is so big that it has a special deal with the postal service which includes Sunday delivery.]


It’s called a Kikkerland Rhino II Folding Stool and they sell for about $11 on Amazon with free shipping.  The version II is sturdier than the original design so be sure to get the Rhino II model.


When folded, it measures about 12”x 12” x 1", so it fits nicely in my backpack.  I mostly use it for macro photography.  For me, this means either wildflowers growing in nature or cultivated flowers growing in botanic gardens. 

Flowers, by their design, tend to lie low to the ground, and this stool really helps me get down to the level of the flowers without resorted to sitting crosslegged on the (often wet) ground, or getting on my knees. My joints feel a lot less “creaky” at the end of a session. It makes the process a lot more enjoyable, whether you use a tripod or, like me, avoid a tripod whenever possible.  I find the stool helps me hold the camera steady.  Often I will put my elbows on my thighs, creating a “human tripod”. 


When in the field, once I have taken the stool out of my backpack, I generally don’t put it back.  When folded, It’s so easy to carry by the handle.  


When not used for my photography, I usually just keep it in my car.  It takes up so little space. We now have a second one in the house.  It comes in handy for changing lightbulbs in the ceiling or swapping out batteries in the smoke detectors, and then folds up nicely to be hidden in a closet (or, in our case, between the washer and dryer).

Hey, it's only $11.  Buy one!


4.01.2017

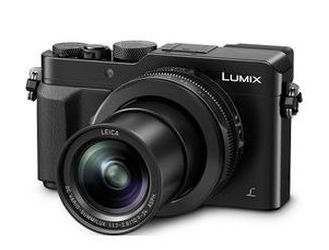
Gear: LX100 At Discount, But I'll Wait For An LX200 (Assuming There Will Be A New Version)


When the LX100 first came out (September, 2014) I was quite excited.  All those retro dials in a smallish format.  Plus it had a mFT sensor which was pretty big for the small size of the camera and the small size of the fixed 24-75 mm-equivalent F1.7 to F2.8 (i.e. fast!) zoom. Albeit the sensor was cropped to about 12mp, but this was fine with me as it accommodated the mult-aspect ratio feature we’d come to know and love with the LX series.

Screenshot from Panasonic website
shop.panasonic.com

I guess what caused me to put a purchase on hold was the price tag of $899US… and to be honest, I was concerned with some of the reports that seemed to indicate some lens softness. I have to admit that lens sharpness is a “thing” with me.  Intellectually, I know it is overrated and that there are so many more important elements that go into making a good photo.  When it comes down to it, I think almost all modern lenses are “sharp enough” and fully “sufficient”, even slow kit lenses. Nevertheless, lens sharpness is always a hurdle for me.

At any rate, because of these concerns, by the end of 2014 I removed the LX100 from my radar screen.

But then a couple of weeks ago, I had another chance to reconsider.  Not only was the LX100 on sale at a trusted seller, Amazon, but they had plenty of them in stock and “more coming”, priced to sell fast at $560 with free shipping.  This was 30% below the retail price of $799 and 40% off the initial retail price of $899! Unfortunately for anyone reading this now who might be interested in buying at that price, this deal has come and gone and the current selling price at Amazon (on April 1, 2017) is $699. 

This was the $560 deal (now gone):


Screenshot from Amazon a few weeks ago.

Currently priced on Amazon at $699:


Screenshot from dpreview.com

However, I was unable to hit the buy button, even at $560.  It seems that a lot has changed in my mind with regard to an appropriate feature set.  Obviously, the camera still works as well as it did when introduced in 2014, when it received an 85% “gold award” from dpreview.com.  But my wish list for features and requirements seems to have expanded over the last 2 1/2 years.  That’s not a good or bad thing, it is just what is.

In passing up on this sale, I also considered that perhaps the heavily discounted price was a sign that a new model (LX200?) is coming.  I am hoping that the LX100 was successful enough that it warrants an upgrade. 

What would really kindle my interest in the next version of the LX100 (if there is one coming along) is one or more of the following “improvements”, listed here in order of my interest:

(1) A bigger EVF, preferably OLED so I can see through it with polarized glasses.  The bigger EVF can be accomplished in appearance without increasing the physical size by changing the EVF to a 4:3 aspect ratio instead of the current 16:9. I understand that the GH series has an OLED viewfinder with 4:3 aspect panel.

(2) Tilting display with touch screen capabilities.

(3) A new lens, equally fast, perhaps longer (24-90?, 24-105?) and sharper than the current one.

(3) Better image stabilizing. Gordon Laing was disappointed to find in his review on cameralabs.com that the stabilization system only provided a 2-ish stop advantage where he’d expected more like 3-4 stops.

(4) ND filter built in.

(6) A 20mp sensor ...which would need to be cropped to about 15mp to accommodate the multi-aspect ratio feature.

(5) Ability use a self-timer and bracketing at the same time.  I think currently, like other cameras I’ve owned from Panasonic and Olympus, the self-timer and bracketing are in the same drive mode so that you can choose only one or the other. (The work-around is to use a remote shutter release.)

(6) All the photo stacking and photo bracketing features that are now included on the upper end Panasonic’s.  I think the LX100 may have photo bracketing, but not photo stacking.  There were hopes for a firmware upgrade to accomplish this, but as far as I can tell that never happened.

(7) Blue Tooth for easy fast transfer to my cell phone for sharing. (I don’t have any cameras with this, so not exactly sure how advantageous this is… but it seems to be the direction upscale cameras are heading)

I guess that's a healthy list of "improvements".  I'm looking forward to seeing what Panasonic comes up with next.


3.26.2017

Photo Story: The Wharf at Thurston's Lobster Pound, Bernard, Maine


Thurston's Wharf

Olympus E-M1
Olympus 12-40mm F2.8 @ 15mm (30mm equiv.)
1/60s, F8, ISO200
__________

Photo Story

I recently picked this image to submit for a Photo Club critique.  Not sure why I picked it. It certainly isn't a "fine art" image.  I guess it is more of a documentary image. But I like it a lot, and I thought I'd post it here along with a bit of the Bernard story.

Thurston's Wharf and Thurston's Lobster Pound are located side-by-side in the Village of Bernard, Maine on Mount Desert Island (MDI), Maine.  MDI receives millions of visitors each year because of Acadia National Park. However, I should point out that Acadia is mostly on the right side of the island, along with the heavily visited Bar Harbor.  Bernard is on the left side of the island.  The left side is often called the "quiet side".

We've traveled MDI off and on for thirty plus years and have always enjoyed our visits.   But it was not until three years ago that we found (accidentally) the road that leads to Bernard. It barely exists on the maps but is worth finding.

The main attractions in the immediate area around Bernard seem to be Bass Harbor and Bass Harbor Head Lighthouse.  The lighthouse is on the to-do list of any serious photographer and the village of Bass Harbor (confusion here: there is the harbor call Bass Harbor; the village called Bass Harbor lies along the eastern shore of the harbor) is the terminus for the Swan Island Ferry and the Frenchboro Ferry. Access to the lighthouse, the ferries, the village and the harbor is along route 103.  

On the “other” side of the harbor is the Village of Bernard, where this photo was taken. To see the village (and dine at Thurston’s!) you will need to get off route 103 and head south on a secondary road called, you guessed it, Bernard Road. It's easy to miss. If you are in the  area be sure to put Bernard into your GPS or cell phone navigator.  The GPS  coordinates are: Latitude 44.240766; Longitude -68.352143.

Bernard is a fishing village.  Our first visit there was about 3pm in October a few years ago.  At that hour the lobsterboats were streaming into the harbor with the day’s catch. It was great fun to watch the unloading of lobsters. However, this particular picture was taken during a subsequent visit. It was 1pm when this photo was taken, just minutes after we dined on Lobster Rolls at Thurston’s.  

Before I forget, Thurston’s has a great tag line: “Thurston For Lobster”. Get it?  Thurston, as in thirstin’!

3.19.2017

Photo Story: Second Blizzard of the Season


Blizzard Conditions

Olympus E-M1
Olympus 12-100mm F4 @100mm
F8, 1/15sec, ISO200
__________

Photo Story

We had our second blizzard of the season last week.  Cancelations (including our local schools and my workplace) started the night before, as the storm was predicted to arrive just in time for the morning rush hour and to be heavy right through the evening rush hour.  We were right on the border between a predicted 12-18” snowfall and an 18-24” snowfall. Ultimately, we ended up with 12" of windblown, wind-packed, rain impregnated snow. 

Laurie and I had no reason to drive anywhere … so we didn’t. And except for photographing this scene, we stayed indoors, watching the storm develop while sitting by a comfy fire. Our generator was all gassed up in case we needed it, but we never did lose electric. 

Wind gusts reached 60mph, but our trees stayed upright. I would say "just" a few branches lay around the yard when it was all done, except that one of the branches with a 2" diameter was buried under the snow in the driveway.  After hitting that with the snowblower, I was glad I had an extra shear pin!

I mentioned at the top of this post that this was a blizzard.  I always like it when the meteorologists remind us of the technical definition of the term, as I always forget.  (This time I created a “note” in Evernote for future reference.)  To be a blizzard, these three things must exist:

Winds with a minimum speed of 35mph
1/4 mile visibility due to snowfall
3 hours of the above conditions

Notice there is no snow depth requirement.  My guess is that we had these conditions for about 9 hours.

3.09.2017

Photo Story: The Mönch at Sunset, Switzerland, 1968


The Mönch at Sunset, Switzerland 1968

Kodak Retina iiiC
Schneider 50mm F2 lens
Kodachrome (ASA 64 or 100)
__________

Photo Story

The Monch is a frequently climbed mountain on one side of the Jungfraujoch. (To find out why I was there in the summer or 1968, see my prior two posts.)  It was first climbed in 1857. Along with the Jungfrau (rising on the other side of the Jungfraujoch) and the Eiger, the three mountains form what is called the Berner Trilogy. The Jungfraujoch is a saddle (about 11,371' elevation) between the Jungfrau (13,642') and the Mönch (13,445'). The neighboring Eiger has an elevation of 13,020'.

The best time to climb is said to be from mid-June to the end of September.  Many make this a day trip by taking the first train from Kleine Scheidegg to the Jungfraujoch, the highest railway station in Europe. 

The easiest route to the Mönch summit is along the ridge seen here to the right of the summit. Beginning at the inside-the-mountain railway station (maybe a couple of hundred yards from where I am standing to take this picture), the trek starts with a fairly safe traverse (off to the right of this photo) across the glacier to the base of the Southeast Ridge route. From there, the vertical distance to reach the summit is 1,400 feet.  The summit has an altitude of 13,445 feet. 

Much of the climbing is along an exposed and narrow ridge that is typically cornaced.  I have a decent photo of the mountain taken while standing on the glacier, which I will scan and include in my next post.

Even in summer, the ascent is mostly over snow and ice. There are some rock climbing sections, too. Though I understand that the route is technically straightforward, there are some dangerous sections because much of the climbing is along an exposed and narrow ridge.  

In fact, a group of three Americans were killed that summer, falling from the ridge and 2/3 down the side of the mountain.  A small rescue helicopter was needed for the recovery, and I recall watching the operation through binoculars.

Please note that I have not climbed the Monch.  What I know is based on what I was told or have read.  I only ventured as far as the glacier traverse to the base of the Southeast Ridge route.  Though a fairly stable part of the glacier, watching out for crevasses was all the danger I wanted!

3.06.2017

Photo Story: Sunset From the Jungfraujoch, Switzerland in 1968.

Kodak Retina iiiC
Schneider 50mm F2 lens
Kodachrome slide film (either ASA 25 or 64)/Scanned


Sunset From the Jungfraujoch, Switzerland in 1968

In my last post I included an image from the Aletsch Glacier showing the Hotel Berghaus at the Jungfraujoch, Switzerland, the highest (at the time, and presumably until it burned down) hotel in Europe at an elevation of 11,000-ish feet. During my two months living and working there, afternoons and evenings were often socked in with clouds.  But occasionally we had spectacular views and sunsets.

The photo below was taken in the evening, in July or August (I was only there in the summer) of 1968, sometime after dinner. Obviously at this altitude, the sun sets late!  

One thing which the photo could not record, but which I remember distinctly, was the sound of cowbells in the valley below. Even on clear evenings (i.e. not socked in with clouds) like this one, it was often too windy to hear anything but the howl of the wind. But, on this particular night, the air was still, and the view looking west and the sounds from the valley below had me smiling.


3.03.2017

Photo Story: Nearly 50 Years Ago I Was In Switzerland


Today I'm going back about 50 years, to the first time I borrowed my dad’s “good” camera. I was on my way to a summer in Europe.  The camera was a German made Kodak Retina iiiC rangefinder with a 50 mm F2 Schneider lens.  By today’s standards that would be a fairly limited kit; but back then it was all I had and I really enjoyed it.  

The main venue was Switzerland in 1968, during a college summer break.  I had a job at the Hotel Berghaus atop Switzerland’s Jungfraujoch.  This hotel was carved into the rock and was at the head of the Aletsch Glacier.  It was located in the "saddle" (joch) between two mountains, both of which are climbing destinations: the Jungfrau and the Mönch.  The Eiger is also nearby. 

The hotel has since burned down; but at the time it was the highest hotel in Europe.  The elevation of the hotel was 11,000 feet.

Access to the hotel by tourists (and there were many every day) was by an electric powered train that traveled through a winding tunnel inside the mountain. The entrance to the tunnel is at the base of the Eiger, in Kleine Scheidegg, and it winds for six miles inside the Eiger and Monch mountains to the Jungfrau terminal, the highest train station in Europe.

Along the tunnel there are two stops.  Passengers can get out at these stops and see through windows cut into the north wall of the famous Eiger.    

What did I do in the hotel?  I worked in the kitchen. My specialty was pommes frites (French fries). Seriously! I made them by hand, using a hand operated machine that drove a whole potato lengthwise through a grid of blades. 

Lunch was a madhouse as hundreds were served daily (unless we were in the middle of a cloud or snow storm, conditions which usually meant very few would invest in the long and expensive train ride to the hotel).  Generally this was a day-trip destination, with very few visitors spending the night or staying for dinner.  As I recall, the best views were in the middle of the day.  In the afternoon, the clouds often rolled in and visibility could go to zero. 

I took the photo below after skiing down to the glacier from the hotel. There is an exit to the mountain just out of sight to the far right. Notice the roof to the hotel in the background.  It's barely noticeable because it blends so well into the rock. 

Seen in this picture is single-engine plane which crashed while flying low and slow so that photographers could take some photos.  All aboard were killed.


Kodak Retina iiiC
Schneider 50mm F2
Kodachrome slide film (ASA 25 or 64)


2.27.2017

Photo Story: Sea Smoke on Penobscot Bay


I don’t claim to be an expert on fog, smoke or steam.  My prior post called “Fog on Penobscott Bay” was about a photo I took one early morning in August.  I did a bit of research online and found that there are several kinds of fog.  My conclusion based on the definitions given, was that the summer fog we experience along the Maine coast is “advection fog”. It requires warm air over cold water.Well, today I explored online the concept of “sea smoke”. I had seen a number of photos of sea smoke, though mostly they were taken along the Maine coast in the winter.  Nevertheless, I was pretty sure that is what I saw one cold morning last October.


Sea smoke can occur when cold air moves over warm water.  (It seems this is the opposite of the conditions that lead to fog.) I think this is what happened in the image shown below. 


This image was taken on a cold October morning.  I am presuming that the air temperature was colder than the water surface temperature.  It was about 6:45 a.m. and the sun had just begun to show itself.  I’m thinking this created the required layer of moisture-saturated air above the water that then cools and condenses. 


Of course I could be wrong about this, but it nevertheless was a pretty picture.

Olympus E-M1
Panasonic 14-140 F3.5-F5.6 
@ 140mm (280mm fffl)
1/2500s
F5.6
ISO 200