On my main Web site I've added a "recently added" page, which shows as an additional tab across the top of the home page here: http://www.peterfraileyphoto.com/.
Though all galleries (old and new!) can also be accessed via the "all galleries" tab on the home page, a "recently added" page will make it easier to see what's been added since your last visit.

5.31.2010
A few samples from my Dad's 1955-1956 Kodachromes
In my prior post I outlined the procedure I am using to duplicate my old slides. But I started with a set of Kodachromes taken by my dad when we left the Boston area and drove out to Los Angeles, where my dad worked in 1955 and 1956. Below are several of my favorites from that batch of slides (I'm the bigger of the two boys):


5.09.2010
To scan or not to scan old Kodachrome slides (revised)
For a few years I have been wondering what to do with my old slides. I am now ready to bite the bullet and get them digital-ized. It is just so much easier to show images on a computer or televison or digital projector. I have about 3000 slides taken between about 1968 and 1984. And my dad has some great Kodachromes from the 1950's taken with his Kodak Retina IIIC rangefinder. As the slides age I am fearful of lost quality. This is another reason to convert them to digital now.
Scanning seems to be the standard approach to creating digital files from slides, negatives and prints. To this end I have considered various dedicated film and slide scanners. The Nikon Coolscan would be a good choice but even the basic one is over $1,000 and currently very hard to find. Many of the best slide scanners have been discontinued, such as those made by Minolta. There are some newer dedicated slide scanners that sell for about $400, and I have been impressed with what I have read about Plustek's OpticFilm line of film scanners.
But scanning takes a lot of time. With the OpticFilm scanner a quick scan can take a minute, while the highest quality scan can take 17 minutes. And with 3,000 slides I just can't justify the time required. So, I decided to go in a different direction. I purchased a "digital duplicator" that screws into the filter threads of a dSLR or any point-and-shoot or ultrazoom camera that has a lens adapter. The one I bought is by Opteka. Bower makes one as well. I paid about $50. The camera I am using for this is a Canon G9. I already had a lens adapter for the G9 for use with filters, so this was not an additional expense. I could have used my dSLR gear, but the G9's 3" Liveview LCD with live histogram makes viewing the slide and getting a good exposure simple. The limitiations of a small-sensor camera like the G9 are not evident during the duplication process because I can shoot at base ISO of 80 and dynamic range has already been reduced during the original image capture. An AC-adapter is also helpful, and I already had one of these for the G9.


The duplicator is basically an extension tube that is screwed into the filter threads. A 58-52mm stepdown ring was included in the Opteka kit. At the thread end of the tube is an acromatic closeup lens (equivalent to a +10 diopter) and at the other end there is a slide holder. You just need to point toward your light source and shoot! Compared with a scanner that takes one to 17 minutes to process the image, with this device the processing is less than 10 seconds (I use the camera's custom self-timer set for 8 seconds).


Right now I am going through 100 slides my Dad took in 1955-56, when we drove through national parks on our way west to live in California for a year. The first few were shot in JPEG, but I quickly switched over to shootng in RAW format. ISO is set as low a possible, with the G9 that is 80. Aperature priority allows me to use the sweet-spot in the lens. Depth of field is not an issue. Occasionally the focus point needs to be moved around to a high contrast area of the slide to ensure focus-lock (example: I had to move the focus point from the white area of Niagra Falls as shown in the image above to another area with more contrast). Using the Liveview LCD and the Liveview histogram, I sometimes need to adjust EV compensation to keep away from blown hightlights, but this is rarely needed because the slides themselves have generally been properly exposed. The files are then imported to Adobe Lightroom for the same tinkering I would do with a scanned image.
The quality of the results is better than I expected. I am very happy with what I see on my 24" computer monitor, 5"x7" prints are excellent and the one test print I did at 8"x12" was astonishingly good. I plan to try 15" and 18" prints, to determine how large prints can get before the quality degrades, but have not done so yet. Of course, your mileage may vary, and perhaps I gave the prints high scores because my expectations had been low. But most of these slides are snapshots (kids at the beach) or "record" shots. So, they don't need to be of the very best quality, and I am willing to sacrifice a bit of quality (compared with scanning) in exchange for the speed of getting the job done.
My guess is that after duplicating 3000 slides with the Opteka devise, I will have the best 100-200 slides scanned by a professional lab. But this will be at a small fraction of the cost of buying a scanner and will take none of the time.
Scanning seems to be the standard approach to creating digital files from slides, negatives and prints. To this end I have considered various dedicated film and slide scanners. The Nikon Coolscan would be a good choice but even the basic one is over $1,000 and currently very hard to find. Many of the best slide scanners have been discontinued, such as those made by Minolta. There are some newer dedicated slide scanners that sell for about $400, and I have been impressed with what I have read about Plustek's OpticFilm line of film scanners.
But scanning takes a lot of time. With the OpticFilm scanner a quick scan can take a minute, while the highest quality scan can take 17 minutes. And with 3,000 slides I just can't justify the time required. So, I decided to go in a different direction. I purchased a "digital duplicator" that screws into the filter threads of a dSLR or any point-and-shoot or ultrazoom camera that has a lens adapter. The one I bought is by Opteka. Bower makes one as well. I paid about $50. The camera I am using for this is a Canon G9. I already had a lens adapter for the G9 for use with filters, so this was not an additional expense. I could have used my dSLR gear, but the G9's 3" Liveview LCD with live histogram makes viewing the slide and getting a good exposure simple. The limitiations of a small-sensor camera like the G9 are not evident during the duplication process because I can shoot at base ISO of 80 and dynamic range has already been reduced during the original image capture. An AC-adapter is also helpful, and I already had one of these for the G9.


The duplicator is basically an extension tube that is screwed into the filter threads. A 58-52mm stepdown ring was included in the Opteka kit. At the thread end of the tube is an acromatic closeup lens (equivalent to a +10 diopter) and at the other end there is a slide holder. You just need to point toward your light source and shoot! Compared with a scanner that takes one to 17 minutes to process the image, with this device the processing is less than 10 seconds (I use the camera's custom self-timer set for 8 seconds).


The quality of the results is better than I expected. I am very happy with what I see on my 24" computer monitor, 5"x7" prints are excellent and the one test print I did at 8"x12" was astonishingly good. I plan to try 15" and 18" prints, to determine how large prints can get before the quality degrades, but have not done so yet. Of course, your mileage may vary, and perhaps I gave the prints high scores because my expectations had been low. But most of these slides are snapshots (kids at the beach) or "record" shots. So, they don't need to be of the very best quality, and I am willing to sacrifice a bit of quality (compared with scanning) in exchange for the speed of getting the job done.
My guess is that after duplicating 3000 slides with the Opteka devise, I will have the best 100-200 slides scanned by a professional lab. But this will be at a small fraction of the cost of buying a scanner and will take none of the time.
4.18.2010
25,000 Daffodils at Tower Hill Botanic Garden
The gardens at Tower Hill are beginning to bloom. The blooming trees are fabulous. My favorite is the pear tree, which has a unique flowery-peary-smell to it and was covered with very happy bees. The second to last image below, showing white flowers is from the pear tree. The final picture, though it shows a bee, is some other pretty flower.
The field which later in the season will be covered with wildflowers was instead covered with Tower Hill's "signature" 25,000 daffodils. The image below captures perhaps half of the field.
The normal focal length snapshots were taken with my pocket camera as I didn't want to switch lenses from the 70-300mm lens on the Olympus. The closeups were taken with the 70-300. Typically I set the lens at 150mm which allows me to fill the frame with a 3-4" subject at a focusing distance of 3.1'. This is a very nice working distance.
But the closeup of the three daffodils was shot at 300mm due to the fact that these were in the formal garden where I needed to stay on the path. I think the flowers were about 10 feet away. The crop was minor, essentially cropping the Olympus's native 4:3 aspect ration to 3:2.
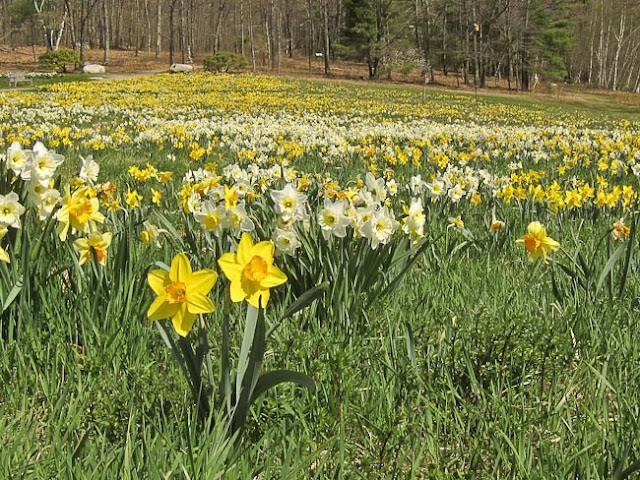


The field which later in the season will be covered with wildflowers was instead covered with Tower Hill's "signature" 25,000 daffodils. The image below captures perhaps half of the field.
The normal focal length snapshots were taken with my pocket camera as I didn't want to switch lenses from the 70-300mm lens on the Olympus. The closeups were taken with the 70-300. Typically I set the lens at 150mm which allows me to fill the frame with a 3-4" subject at a focusing distance of 3.1'. This is a very nice working distance.
But the closeup of the three daffodils was shot at 300mm due to the fact that these were in the formal garden where I needed to stay on the path. I think the flowers were about 10 feet away. The crop was minor, essentially cropping the Olympus's native 4:3 aspect ration to 3:2.


3.25.2010
Don't miss this exhibition
If you live in eastern Massachusetts I highly recommend seeing the exhibition "Treasured Land: The Fifty-Eight U.S. National Parks in Focus". It features about 100 photographic prints taken by photographer Quang-Tuan Luong over a fifteen year period during which he photographed all 58 national parks with a large-format camera. The exhibition is at the National Heritage Museum in Lexington, Massachusetts, and it will be there until October 17, 2010. These images were taken with my Canon S90 compact camera without flash. That's Quang-Tuan in the second picture.


My wife and I heard him speak at the Museum earlier this month. Unfortunately due to his heavy French accent, and a soft and monotone voice we were unable to understand him. This was disappointing because he had many stories to tell about how he captured a selection of his images. And I couldn't understand the stories!
Quang-Tuan is working on a book which he expects to include several hundred of his image. His Web site also indicates that Ken Burns featured him in his PBS series on National Parks.


You can also access his images through his Web site, http://www.terragalleria.com/. The national parks gallery on his Web site features over 7000 images. But nothing can compare with the exhibition of his prints. I think I will be happy just to view his prints at the museum, because though they are available for purchase through his Web site, at $600 for a 36-inch print, for example, they are expensive. On the other hand, even these large prints are very sharp and detailed due to his large-format camera that uses 5"x7" film, which is 25 times the surface of 35mm film (and, in turn, 35mm film has more surface than most dSLR sensors).
In one of the pictures in his presentation I think I read the label Technika or Tachihara on the camera and the lens was a Schneider lens. The camera he is using in the picture above is a Nikon dSLR, and it had the size of a full-frame model. He has a wealth of information on another Web site, http://www.largeformatphotography.info/


Quang-Tuan is working on a book which he expects to include several hundred of his image. His Web site also indicates that Ken Burns featured him in his PBS series on National Parks.

3.19.2010
Learning to photograph butterflies
I'm lucky to live near two butterfly houses. My first experience with captive butterflies was last spring when our photoclub went to The Butterfly Place in Westford, MA. We rented the facility for an hour for a small fee, which provided us with access on a Saturday before the normal 10 a.m. opening. We could stay as long as we wanted; but the advantage of that first hour was the greenhouse (for lack of a better word) was still cool from the lower nighttime temperature. This meant the butterflies were sluggish and easier to photograph, until the heat and fans were turned on at 10 a.m.
I used a Panasonic FZ8, a camera known as an "ultrazoom" because it provides an optical zoom lens with an equivalent field of view of 35mm (moderately wide angle) to 420mm (nice telephoto). One feature of the Panasonic ultrazooms is something called a "telemacro". What this does is provide a partial macro feature at the full zoom of 420mm. The result is that a 4" wide object (for example, a butterfly with a bit of background) can fill the viewfinder, all at a convenient focusing distance of about 33".
Below are a several of my favorites from that outing. Each was taken without a flash, and the camera was hand-held. The problem with the Panasonic is that because of its small sensor, the noise level at even ISO 200 is a bit on the unacceptable side. I used software to reduce the noise. Also, due to the smaller sensor the depth of field is greater than a dSLR, which can be good but also means backgrounds are more in focus and therefore often distracting.


The second butterfly house is in Deerfield, MA and is called Magic Wings. This winter I went there during normal hours and had a difficult time because the butterflies seemed to be in constant flight. Below are a few of the images I was able to get.
This time I had an Olympus E-520 dSLR with a 70-300mm zoom lens. This lens provides an excellent macro at full zoom. A 1.5" subject will fill the viewfinder. And at 150mm, where this lens is known to be sharper, a 3" subject will fill he viewfinder. All this at a focusing distance of about 40".
My camera was set at Shutter-priority, with Auto ISO. I used 1/500th second shutter setting but will want to try 1/250th next time so as to use a lower ISO. My exposure meter is set to center-weighted. I use EV compensation depending on the darkness/lightness of the subject butterfly. Again, no flash was used, and the camera was hand-held.
Note that the backgrounds on this second set of images are blurrier and softer. This is because the depth of field is so much less on a dSLR at equal aperature openings.


Finally, I'd like to mention a good online resource, http://www.learnaboutbutterflies.com/, which also has a section on butterfly photography.
I used a Panasonic FZ8, a camera known as an "ultrazoom" because it provides an optical zoom lens with an equivalent field of view of 35mm (moderately wide angle) to 420mm (nice telephoto). One feature of the Panasonic ultrazooms is something called a "telemacro". What this does is provide a partial macro feature at the full zoom of 420mm. The result is that a 4" wide object (for example, a butterfly with a bit of background) can fill the viewfinder, all at a convenient focusing distance of about 33".
Below are a several of my favorites from that outing. Each was taken without a flash, and the camera was hand-held. The problem with the Panasonic is that because of its small sensor, the noise level at even ISO 200 is a bit on the unacceptable side. I used software to reduce the noise. Also, due to the smaller sensor the depth of field is greater than a dSLR, which can be good but also means backgrounds are more in focus and therefore often distracting.


This time I had an Olympus E-520 dSLR with a 70-300mm zoom lens. This lens provides an excellent macro at full zoom. A 1.5" subject will fill the viewfinder. And at 150mm, where this lens is known to be sharper, a 3" subject will fill he viewfinder. All this at a focusing distance of about 40".
My camera was set at Shutter-priority, with Auto ISO. I used 1/500th second shutter setting but will want to try 1/250th next time so as to use a lower ISO. My exposure meter is set to center-weighted. I use EV compensation depending on the darkness/lightness of the subject butterfly. Again, no flash was used, and the camera was hand-held.
Note that the backgrounds on this second set of images are blurrier and softer. This is because the depth of field is so much less on a dSLR at equal aperature openings.


Finally, I'd like to mention a good online resource, http://www.learnaboutbutterflies.com/, which also has a section on butterfly photography.
3.08.2010
Fred LeBlanc shows his nautical images

Besides showing us his wonderful images, he shared his thoughts on composition, and described some of his photoshop enhancements. Since many of his images are taken while onboard one ship, with a second ship being his intended subject, one of his styles is to shoot while using the rigging, life boats, winches, etc. of the onboard ship to frame the subject. Though I wondered in some cases whether this complicated the image, I nevertheless found the style very appealing.
Many of us who had seen his Web site before the night of the presentation wondered how he captured such dramatic skies. Well, thanks to photoshop he very often adds a new sky to a schooner image for added impact. He said he takes every opportunity he can to photograph a dramatic sky, with the thought that it might be added to a schooner image via photoshop.
Be sure to check out his galleries and Web site: http://www.frederickleblanc.com/

2.28.2010
Canon S90 goes cross country skiing at Windblown in New Hampshire

 Like most cameras, I find the S90 has a tendency to underexpose snow scenes. Metering systems tend to underexpose snow because they are trying to convert a bright scene into mid-tones. Unfortunately, when you underexpose white, the mid-tone you get is gray.
The easiest way to get whiter snow is to increase the exposure, using EV compensation. I typically shoot scenery in the P mode, and I have programmed the S90's unique front ring (around the lens barrel) so I can adjust EV (exposure compensation) with it.
When on snow, I set the front ring at +1 EV. This adds one stop of exposure to the metered amount. It makes the snow whiter, and dark objects against the snow, such as trees and people, become brighter.
The following are some examples.
Normal evaluative metering (If you don't notice the grey color of the snow,
put a piece of white paper up against it):
put a piece of white paper up against it):

+1 EV makes snow whiter (Still a bit grey, but much better):

Having said all this, in the bright light that accompanies skiing and with polarizing goggles, it is often impossible for me to use the LCD and the histogram to verify that the exposure is reasonable, even when I have set the EV compensation at +1 EV. For this reason, I have come up with an additional procedure.
I have customized the custom mode (which is then accessed by turning the command dial on the top of the camera to "C") to provide me with instant three-shot exposure bracketing. I set up my custom mode to shoot in P-mode, auto ISO, auto WB, no flash, center focus, evaluative metering, and exposure bracketing. I have the three-shot bracketing set up to shoot at 0 EV, +1EV and +2EV. I download everything onto my computer at the end of the day. I then pick the image I like best of each set of three, and delete the rest.
For what it's worth, the small free-spinning wheel on the back of the camera adjusts ISO in the P mode. I usually keep this set at AUTO ISO. In low light situations, the camera will bump up the ISO as far as 1600 if necessary, though when outdoors on snow the ISO will generally remain at its lowest level of 80.
For what it's worth, the small free-spinning wheel on the back of the camera adjusts ISO in the P mode. I usually keep this set at AUTO ISO. In low light situations, the camera will bump up the ISO as far as 1600 if necessary, though when outdoors on snow the ISO will generally remain at its lowest level of 80.
All these settings work nicely for me, as long as I don't inadvertently nudge the spinning wheel on the back of the camera. I find it interesting that on the larger G-series cameras like my G-9 (and I presume also on the newer G models) the spinning wheel has clicks on it. This is preferable in my opinion and in the opinion of everyone I've read on various photography forums such as at dpreview. My hope is that they will change this on the next version of the S-series.
2.10.2010
Nature photographer Robert O'Toole
 Last weekend Robert O'Toole gave a fantastic workshop on wildlife and nature photography. It was held at the Radisson Hotel in Chelmsford, MA, and was sponsored by Nashoba Valley Photo Club (of which I am a member), Hunt's Photo and Sigma lenses.
 There were 90 attendees from clubs from several New England states. All of us were rewarded with some beautiful images and some great tips and techniques.

Robert showed a series of his wildlife and nature images, most noteably eagles and grizzly bears in Alaska and shared tips and techniques used to capture the images. He concluded the three hour workshop by showing a few post production techniques he's developed over the years with Photoshop, all of which are available for purchase on a CD.
I like to bookmark other photographer's Web sites. And I most certainly recommend bookmarking http://www.robertotoolephotography.com/ ! If you get a chance, at least go into his web portfolios and browse through his Alaska photos. On his Web site you will find information on his field workshops to Alaska and other destinations. He also offers workshops in post production image optimization.

2.06.2010
Canon S90 goes with me skiing at Cannon Mountain, New Hampshire
 This was my first outing in the cold with the pocketable Canon S90, arguably the best (matter of opinion of course) compact camera currently available. A compact camera in my opinion must be sleek enough to not only fit in the front pocket of a pair of jeans, but also slide easily into that pocket. To do this it must have a retractable lens. It also has to be light enough to be barely noticeable. A camera of under 7 ounces will do the trick.
In spite of the sun on this day, the base temperature at the mountain was about 15F. We saw no thermometers at the top of the mountain, and maybe this was a good thing.
I kept the camera in an outside pocket of my jacket so that it would be cool enough not to fog up when using, yet warm enough not to freeze. To be honest, any compact could probably have done as well with the images. With such bright sun I was able to shoot at ISO 80, and ISO where small-sensored cameras will do just fine when the sun is behind your back.

Basically I shot large, high quality JPEGs in "P" mode, which is a mode that allows the camera to pick both the shutter speed and aperature. I used Auto White Balance, and Auto ISO (though there was enough light so the camera always chose ISO 80). After each shot I confirmed my exposure with the histogram, then used the camera's unique front dial to make any EV compensation adjustments should I feel a follow-up shot was necessary to get the exposure right. This was the best I could do, because with such bright light it was next to impossible to see the LCD in spite of its 3" viewing area with 461,000 dots.
The auto white balance resulted in a bit too much blue, so I added some amber in post-processing with Lightroom. But snow does funky things with white balance and exposure. Next time I might try the snow scene mode and see how that does. The snow scene mode adds a bit more exposure,which is important in snow scenes to compensate for the light meters tendency to reduce white snow to medium grey tones. The scene mode also helps with the white balance problems created by snow.
Other than that, I cropped most of these in Lightroom as it was very hard in the bright light to properly compose the pictures in-camera, especially since I was wearing polarized ski goggles! That's Mt. Lafayette in the background in the 1st, 3rd and 5th images.
I have 19 pictures posted on the Web site, which can be accessed with this link:


Subscribe to:
Posts (Atom)